To avoid these ads, REGISTER NOW!

New money pit ... ummm I mean garage

mpraddict

Well-known member
Joined
Jan 28, 2007
Messages
269
Location
Central Ohio
I just joined, and there's a little about me over in the introduce yourself section. Thought I'd share pics of my project. It's 30'x60' and it will be divided basically in half, garage on one side and shop on the other. The first couple of pics are from a month and a half ago and the last couple are just a couple of weeks old. I'm doing the work myself, so it's a little slow!

0613.jpg

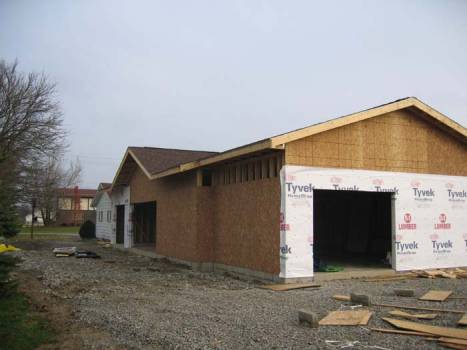
10' high walls, side and rear access

0616.jpg

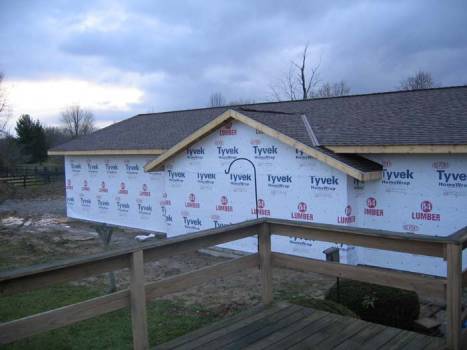
View from deck/back yard

0600.jpg

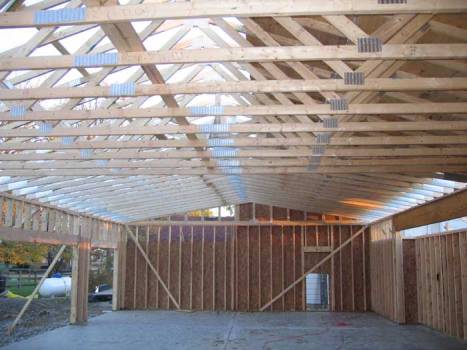
Flat trusses in shop area and scissor trusses in garage for future 4 post lift(s). The bump out on the right side is 2' deep for cabinet space.

0642.jpg

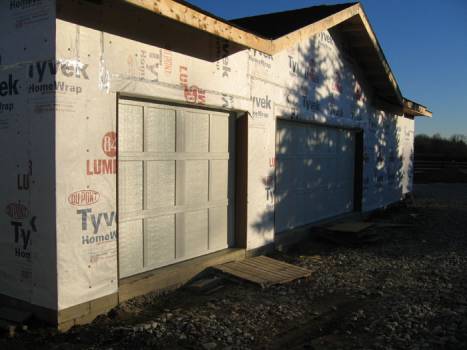
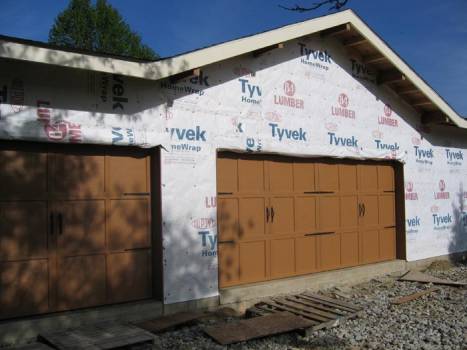
Overhead doors are finally installed
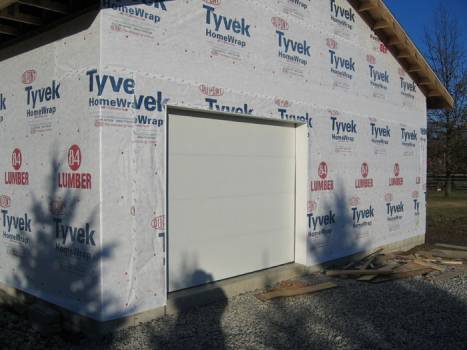
0640.jpg

last photo for now

I'm hoping the weather will warm back up so I can get trim and soffit finished and move on to siding soon! More updates to come.

Eric
 
To avoid these ads, REGISTER NOW!

volvo

Well-known member
Joined
Feb 19, 2006
Messages
1,304
Location
PNW 45th Parallel
Now that is a garage that I could fill. Looking very good there Eric, and Welcome. Post more pic when your get them, always looking for progress pics and that Happy final painted completion one when it comes...H
 
OP
M

mpraddict

Well-known member
Joined
Jan 28, 2007
Messages
269
Location
Central Ohio
Thanks guys,
The amount of time I spent designing this garage, getting the layout just right, picking the exact perfect colors and materials....
I do this type of thing (design buildings) for a living (except never a garage before) and it would have taken a tenth of the time if I was doing this for anyone else! It's amazing how much you can second guess yourself when doing your own projects.
 

DynoDave

Well-known member
Joined
Mar 25, 2005
Messages
1,685
Location
Michigan
Welcome aboard mpraddict. That's a great looking place. About twice the size of what I'm building.
 

C_F

ALLIANCE MEMBER
Joined
Jan 21, 2005
Messages
9,675
Location
Utah...SNOW BLOWS!
Great looking garage so far, can't wait to see more progress!:thumbup:

I like the roof design too, it sorta breaks up the long look. :)
 

benjacobs

Well-known member
Joined
Sep 15, 2006
Messages
92
It's amazing how much you can second guess yourself when doing your own projects.

Isn't that the truth! Although I haven't attempted to build a garage, even small projects are easy to second guess stuff.

The build looks great so far, it's gonna be big enough to live in. :)
 
OP
M

mpraddict

Well-known member
Joined
Jan 28, 2007
Messages
269
Location
Central Ohio
It is pretty big. I knew it was taking a big chunk of realestate when I did the site plans, but after that that first weekend of framing, seeing the mass of the structure I realized it has a huge presence on the lot!
Thanks for all the positive comments!
 
OP
M

mpraddict

Well-known member
Joined
Jan 28, 2007
Messages
269
Location
Central Ohio
Well, after a cold winter and very little work getting done on the garage, I'm finally making progress again. The doors are painted and the decorative hardware installed. Fascias are on, and I just got the decorative beams installed in the gables. More progress pics to come!
0664.jpg
 
OP
M

mpraddict

Well-known member
Joined
Jan 28, 2007
Messages
269
Location
Central Ohio
New update
Soffits are finally done. I used a dark brown stain on T1-11 for the soffit panels. That along with the wood exposed beams should complement the two color gray siding (just started).....and the driveway as of last week is in! Only siding left on the exterior and I can move to working inside.
 

Attachments

  • 0712.jpg
    0712.jpg
    58.2 KB · Views: 364
  • 0708.jpg
    0708.jpg
    66.4 KB · Views: 350
  • 0723.jpg
    0723.jpg
    59 KB · Views: 311
  • 0717.jpg
    0717.jpg
    49 KB · Views: 317
  • 0716.jpg
    0716.jpg
    60.8 KB · Views: 335
  • 0715.jpg
    0715.jpg
    47.3 KB · Views: 309
  • 0713.jpg
    0713.jpg
    69.3 KB · Views: 375
OP
M

mpraddict

Well-known member
Joined
Jan 28, 2007
Messages
269
Location
Central Ohio
Thanks for the comments!
BTW, I wouldn't want to shovel it either....the cars that will be in that garage won't be coming out in the winter :)
 
OP
M

mpraddict

Well-known member
Joined
Jan 28, 2007
Messages
269
Location
Central Ohio
Long time since the last update. I'm a slow worker, funds have been tight, work has been keeping me very busy,etc.
Anway, here are a few updated photos. I took a detour in the project and attached the new garage to the old one with a breezeway. Also built a large garden tool storage cabinet in the breezeway.
Interior photos: first is the parking side, last two are the shop side. Last photo is the central vacuum
 

Attachments

  • 010.JPG
    010.JPG
    15.7 KB · Views: 582
  • 009.JPG
    009.JPG
    19.8 KB · Views: 578
  • 002.JPG
    002.JPG
    17 KB · Views: 699
  • IMG_1201.JPG
    IMG_1201.JPG
    19.7 KB · Views: 635
  • IMG_1199.JPG
    IMG_1199.JPG
    21 KB · Views: 609
  • IMG_1229.JPG
    IMG_1229.JPG
    29.9 KB · Views: 550
  • IMG_1349.JPG
    IMG_1349.JPG
    27.3 KB · Views: 605
To avoid these ads, REGISTER NOW!
OP
M

mpraddict

Well-known member
Joined
Jan 28, 2007
Messages
269
Location
Central Ohio
Seems like way too long between updates, but I work on the garage as I get time. I've almost finished the shop side now, and just installed cabinets over in the display side. Just a few update pics.
 

Attachments

  • 1759.JPG
    1759.JPG
    45.4 KB · Views: 562
  • 1761.JPG
    1761.JPG
    57.8 KB · Views: 542
  • 1796.JPG
    1796.JPG
    87.5 KB · Views: 522
  • 1770.JPG
    1770.JPG
    144.5 KB · Views: 524
OP
M

mpraddict

Well-known member
Joined
Jan 28, 2007
Messages
269
Location
Central Ohio
Cabinets on the parking/display side I just put in this last weekend. The low cabinets have brushed stainless steel doors and the high cabinets have a high gloss dark gray finish. I'm planning to build display cabinets above the low cabinets for all my 1:18 and 1:24 models.
 

Attachments

  • 810.JPG
    810.JPG
    57 KB · Views: 452
  • 809.JPG
    809.JPG
    64.3 KB · Views: 499
  • 806.JPG
    806.JPG
    52.5 KB · Views: 1,029
  • 805.JPG
    805.JPG
    57 KB · Views: 1,025
  • 803.JPG
    803.JPG
    62.4 KB · Views: 1,067
Last edited:
OP
M

mpraddict

Well-known member
Joined
Jan 28, 2007
Messages
269
Location
Central Ohio
The blue lightining is rope light attached to the underside of the cabinets. I built the cabinet base a little taller than normal and recessed farther back to give the sense the cabinets are floating.
Eventually I'll put in a transulcent ceiling with rope light above, giving the ceiling a glow.
 

thomask

Well-known member
Joined
May 28, 2009
Messages
354
Location
Sunshine State
Cabinets on the parking/display side I just put in this last weekend. The low cabinets have brushed stainless steel doors and the high cabinets have a high gloss dark gray finish. I'm planning to build display cabinets above the low cabinets for all my 1:18 and 1:24 models.

Nice, real nice.

Tell us the plans for the model car cabinets.
 

bww_mnm

Well-known member
Joined
Dec 30, 2010
Messages
673
Location
Chicago area
Seems like way too long between updates, but I work on the garage as I get time. I've almost finished the shop side now, and just installed cabinets over in the display side. Just a few update pics.

praddict ... can you provide some details on your gray slider cabinets? I'm still going back / forth on what I should do w/ that space and yours are some of the cleanest i've seen.
 
OP
M

mpraddict

Well-known member
Joined
Jan 28, 2007
Messages
269
Location
Central Ohio
praddict ... can you provide some details on your gray slider cabinets? I'm still going back / forth on what I should do w/ that space and yours are some of the cleanest i've seen.

bww_mnm - Here's a few pics of the slider shelves under construction. Hopefully they help explain how they were built. The triangular braces allow me to store long items at the front edge without obstruction. Unfortunately I didn't take too many pics during the shelf construction. The sliding doors are 1/4" hardboard sliding on plastic track. Door pulls are 1x2 wood boards screw attached from the back. As you can see in the last pic, they're already full.

thomask - I still haven't finalized plans for the display cabinets. I'm thinking about using a mirrored or dark finish slatwall and glass shelves then adding a frame/glass doors to the front.
 

Attachments

  • 1684.JPG
    1684.JPG
    44.7 KB · Views: 419
  • 1685.JPG
    1685.JPG
    44.3 KB · Views: 441
  • 1762.JPG
    1762.JPG
    43 KB · Views: 436
OP
M

mpraddict

Well-known member
Joined
Jan 28, 2007
Messages
269
Location
Central Ohio
Wow - LOVE the Mopes!! Someones got some class (and cash!). Place looks fanatastic!

Thanks for all the compliments guys...and no I don't have any cash after this build! I never could have afforded to pay someone to do this.
Unfortunately, the garage is already too small, I need to buy a 4 post lift and move the other road runner back there still. It's in the unheated front garage now :(
 

SpeedCoach

Well-known member
Joined
Oct 18, 2007
Messages
633
Location
Chicagoland
bww_mnm - Here's a few pics of the slider shelves under construction. Hopefully they help explain how they were built. The triangular braces allow me to store long items at the front edge without obstruction. Unfortunately I didn't take too many pics during the shelf construction. The sliding doors are 1/4" hardboard sliding on plastic track.


Im building up my plans for a similar cabinet build, where did you get the plastic track for the sliding doors? :beer:
 

UN4GTBL

Well-known member
Joined
Oct 26, 2007
Messages
434
Wow! Great build!

Nice Mopars! Care to share any more pics of them?
 

bww_mnm

Well-known member
Joined
Dec 30, 2010
Messages
673
Location
Chicago area
bww_mnm - Here's a few pics of the slider shelves under construction. Hopefully they help explain how they were built. The triangular braces allow me to store long items at the front edge without obstruction. Unfortunately I didn't take too many pics during the shelf construction. The sliding doors are 1/4" hardboard sliding on plastic track. Door pulls are 1x2 wood boards screw attached from the back. As you can see in the last pic, they're already full.

thomask - I still haven't finalized plans for the display cabinets. I'm thinking about using a mirrored or dark finish slatwall and glass shelves then adding a frame/glass doors to the front.

Thanks for the pics. This helps quite a bit. A quick question ... Did you use front "stiles" that you tie into the celing as well? Thanks. - Brad
 
OP
M

mpraddict

Well-known member
Joined
Jan 28, 2007
Messages
269
Location
Central Ohio
Speedcoach - I believe I did get the tracks from Amazon. I think Rockler sells them too. In hindsight I should have just routed out a 2x4. It would have been a lot easer.

BWW - I'm not sure I understand your question about stiles? I attached a 2x4 flat to the ceiling, then blocked out for the plastic track, then sandwiched the whole thing with a 1x3 on the front face.

UN4GTBL - I'll try to post a few pics of the mopars this evening
 
OP
M

mpraddict

Well-known member
Joined
Jan 28, 2007
Messages
269
Location
Central Ohio
No, the ceiling does not carry any of the load. The triangular plywood gussets (spaced at 4' o.c.) transfer all the load back to the wall. I can slide the doors all the way to one side and have half the shelf entirely open. There are no vertical supports at the front end of this. I sat on the shelf before installing the doors, and it's plenty strong with no deflection.
 
To avoid these ads, REGISTER NOW!
Top Bottom