To avoid these ads, REGISTER NOW!

Vise restoration procedures, techniques, and parts acquisition...

To avoid these ads, REGISTER NOW!
Joined
Jan 21, 2011
Messages
21
I have a wilton 9450, it works great but could use a new set of jaws any advice on finding them would be appreciated. Thx GJ members great info
 

Attachments

  • casey's 7th b-day 110.jpg
    casey's 7th b-day 110.jpg
    136.2 KB · Views: 247
  • casey's 7th b-day 111.jpg
    casey's 7th b-day 111.jpg
    144.9 KB · Views: 199

autopts

Well-known member
Joined
Jul 4, 2009
Messages
2,268
I have a wilton 9450, it works great but could use a new set of jaws any advice on finding them would be appreciated. Thx GJ members great info

Thats a great model Wilton made spanning about 10 years to about 1974. I have serrated jaws, smooth hardened jaws, copper liners, finger savers, and front collars. Whatsha need Dawg!!
 

EJM02

Well-known member
Joined
Oct 23, 2011
Messages
149
I cannot get the rollpin, which holds the retaining screw, out by driving it from the bottom. I have tried soaking it in liquid wrench for 3 days then trying to punch it out but it won't budge! Tried heating it up with a torch to no avail as well. I have an athol so the thing hasn't been moved for around a hundred years. Any advice?
 

autopts

Well-known member
Joined
Jul 4, 2009
Messages
2,268
Yes, a heavier hammer. They will be driven up with a couple of solid hits. Regular wood hammers don't do jack! If you've been using a 16oz already hold that punch with a vise grip and reallly wail! It will come out.
 

riverfever

Member
Joined
Jul 20, 2010
Messages
15
My father in-law recently passed away and my wife and I started going through some of his belongings. A vice is one of the things I found and brought back home along with a 30 gallon compressor and a lot of tools. I was googling the manufacturer and stumbled upon this thread and forgot that I had registered at this site a while back. Anyway...here's the vise.

amz8k9.jpg


I don't know much about it but it is a #52 Prentiss and I think it's pre-war. It's got a lot of patina on it but doesn't appear to have been beat on much.

I already have a Wilton vise from Home Depot so I'm not sure what to do with this one. I suppose I could use it and get rid of mine or I could try and clean it up a bit and sell it. I started taking it apart tonight and here's how it sits now.

34exbgl.jpg


20k5amt.jpg


s3hi60.jpg


I know I could just mount it to the bench and start using it but I hardly knew my father and really looked up to my father in-law and thought it would be nice to fix this up and keep it/use it.
 

LCconvert

Well-known member
Joined
Jul 4, 2011
Messages
47
That is a great old vise, I have been looking for a prentiss for quite a while. My humble opinion...if you only need one vise, get rid of that wilton and keep the prentiss. Not only is it a better vise (the wilton is probably chinese) but it has some family history with it.
 

riverfever

Member
Joined
Jul 20, 2010
Messages
15
I am looking for some help/guidance with my Prentiss 52. I do not have the vise any more apart than what I pictured above. The lead screw has what looks like a castle nut on the inside holding it and the handle on and I don't see how to remove that but don't really know that I have to. I wire wheeled the entire vise and then actually liked the way it looked partially cleaned and decided to not go crazy and paint the thing. So I am trying to get it back together. I have the movable jaw slid into the non-moving side. I can look in from below and see that the lead screw is contacting the threaded portion inside and it feels like it wants to thread but it will not. When taking it apart I did have to gently tap the movable portion from the back to get it to slide out but not much. There really wasn't too much gunk inside and the rectangle areas were all pretty nice and flush. The movable side drops right in until the lead screw hits that spot where it needs to thread into. I've even marked the area right where it enters and gently tapped it to persuade it in further but it hasn't threaded yet. Am I missing something?
 

riverfever

Member
Joined
Jul 20, 2010
Messages
15
OK so this jackass figured out the issue. The threads were a little boogered so I had to get in there and get them cleaned up a bit. All back together now. I just have to mount it to the bench. Sorry for the stupid question.
 

crankshaftdan II

Well-known member
Joined
Feb 25, 2009
Messages
1,293
Location
Milwaukee, burbs.
OK so this jackass figured out the issue. The threads were a little boogered so I had to get in there and get them cleaned up a bit. All back together now. I just have to mount it to the bench. Sorry for the stupid question.

There is no STUPID questions here on the forum--we all learn a little from each other on these old vises--usually a ? is answered by someone who has "Been There-Done That"--pat your self on the back and on to the next vise that you find!!:3gears:
 

riverfever

Member
Joined
Jul 20, 2010
Messages
15
In order to remove the handle and threaded rod from this Prentiss 52 vise, I have to remove this fastener. How do I do that? I've never seen anything like this.

wa1013.jpg


I cleaned it up quite a bit and actually kind of like it like this. I'd like to grease the entire threaded rod better than I was able to but I will have to take the handle off to do that.

243lo2r.jpg


A friend of mine thinks it will rust real quickly again but it's so dry here that I find that hard to believe. I'm almost tempted to leave it like this and see if it does. Worst case...I wire wheel it again and then paint it. Thoughts?
 

Provincial

Well-known member
Joined
Sep 21, 2011
Messages
6,872
Location
Near Salem, OR
Look closely at the "castle nut." The ears are probably meant to be bent down into a recess or hole in the shaft to keep the nut from turning. My guess is that the nut was threaded on to the shaft to a point where the screw would pull the dynamic jaw out with little backlash. Then one of the ears was bent into the hole to hold that adjustment. You might have to use a drill to remove that ear in order to get the nut to turn. Probably there has been enough wear over the years that you won't have to use the same ear to lock your new adjustment.
 

riverfever

Member
Joined
Jul 20, 2010
Messages
15
You were/are exactly right. I ended up hitting one of the ears with a punch and got it to rotate. It ended up breaking off both ears in the process. It is not threaded at all. I ended up reinstalling it and pushing two more of the ears down into those recesses. From what I can tell it doesn't have to be tight at all because it's only job is to back the slide hit against the inside of that jaw and then pull the slide out. Pretty neat. Thanks.
 

allinon72

Well-known member
Joined
Jul 5, 2010
Messages
3,307
Location
Indianapolis
I just acquired a Columbian D44 M8 and the swivel lock is missing it's handle, and it's completely seized. Even after soaking in oil, I cannot loosen it. I'll probably end up cutting it off since the handle is missing anyway. Where can I get a new swivel lock assembly?
 

owyn

New member
Joined
Feb 21, 2011
Messages
2
Location
Manila, Philippines
Long time lurker here; I have a wilton that's pre schiller era (marked chicago). How Does the end caps in the tommy bar come off? I've used some pipe wrench and twisted it counterclockwise but i didn't succeed- the teeth already left some marks. I might as well post here before using more force.
 

SweetD

Well-known member
Joined
Feb 8, 2010
Messages
3,265
Location
Rhode Island
I'm almost tempted to leave it like this and see if it does. Worst case...I wire wheel it again and then paint it. Thoughts?

Nice Prentiss - I have the #92, which is the "sister vise" of the #52, but with the swivel base.

I love the old Patina on my #92, so I just kept it as is and keep a light coat of oil on it.

Located in the NE, it gets pretty humid here, and I have had no issues with keeping it virtually rust-free, as long as I keep it oiled a few times a year. I use good old 3-in-One oil.

DSCF6086.jpg


Dave
 
To avoid these ads, REGISTER NOW!

Private Lugnutz

Well-known member
Joined
Mar 30, 2012
Messages
30,626
Location
The Authentic Jersey Shore
Need some help with a vise that is outsmarting me (which isn't too hard to do sometimes)...

My son was playing around with my bench vise and unscrewed the spindle all the way out. Lucky he didn'tt break his toe. Ayway, now I am having a dickens of a time getting the dynamic jaw back on. The screw just won't line up. It seems to be at an odd angle and lodged against the top of the slide. It will turn, but it's just wearing a ridge into the top of the slide, because it won't line up. The bushing/washer is fine. It's just seated at an odd angle for some reason and won't line up and thread right with the nut inside the fixed jaw. If it matters, this is a small (3.5" jaw width) Wilton swivel base. Can't find a model number. But it's marked 111098 4UX on one jaw and 111099 3UX on the other.

Advice? What am I missing? It should just slip right back in and get screwed right back on, correct? (Um, no, I never cleaned it...)
 
Last edited:

autopts

Well-known member
Joined
Jul 4, 2009
Messages
2,268
Guys, I have that problem alot however my vises are never mounted. I usually turn the whole vise on side and try, if not I turn it completely upside down. One of the 2 positions usually work.
 

amaes

Well-known member
Joined
Feb 8, 2012
Messages
60
Location
Chandler, AZ
So I have some question and couldn't seem to find anything on it using the search tool here. I am new to vises and picked up my first one last week. It’s a Fuller 5" nothing nearly as fancy as a Wilton or other ones you guys are fixing up. Anyways the chrome on the handle is pitted and pealing at one end. What are you guys using to paint the handles that it durable? I am going to be using this vise so I don't want to have to keep re painting it all the time to keep it looking ok. Also the screw/handle that locks it down on the swivel is bent. Is this a standard part that I can replace or am I going to have to make one?

Thanks for the help and the write up. It really helped on taking mine apart.


Here are some pictures of my progress:
574947_3694158363443_1559841819_3155911_1434379498_n.jpg

IMAG00815.jpg

IMAG00849.jpg
 
Last edited:

Private Lugnutz

Well-known member
Joined
Mar 30, 2012
Messages
30,626
Location
The Authentic Jersey Shore
Guys, I have that problem alot however my vises are never mounted. I usually turn the whole vise on side and try, if not I turn it completely upside down. One of the 2 positions usually work.

Thanks. I'll try that, but I have my doubts. I have a feeling the main screw is jammed into its current position somehow. Even though the spindle looks fine, even though it turns, the plane that the long threaded screw is in relative to the slide containing it is just not right, and I can't move it into a parallel position even when I try to force it with a small pry bar.
 

autopts

Well-known member
Joined
Jul 4, 2009
Messages
2,268
Guys, if you have a Wilton bullet and unscrewed the channel all the way out and can't get it to screw back in, take the front collar off and take the spindle out, put the Dynamic assembly all the way back in and then rescrew the spindle back into it.
(thats a long sentence)
 

jcorbin

New member
Joined
Jan 24, 2012
Messages
1
"Stamped Steel Slide" Vises:

These vises are an odd cross between an exposed screw and a rectangular slide. Columbian and Desmond-Simplex are the ones that I have seen that use this style of cunstruction. They are considered by many (myself included) to be a medium duty vise (compared to a heavy duty USA/Euro vise, they will outclass a cheap import by a huge margin). I will be using the Columbian 3.5" that Selkirk has asked me to restore for the pics.

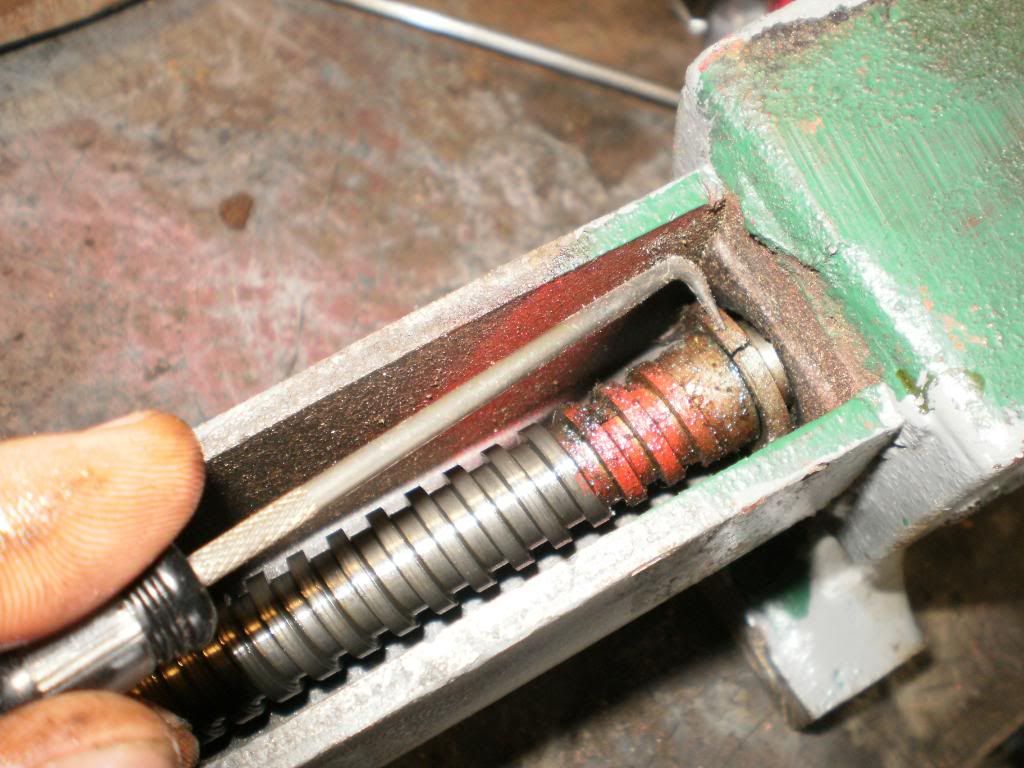
The steps for one of these is essentially the same as for an exposed leadscrew vise. The challenge with these is simply getting the crimped anti-reversal ring off of the damn screw.

P5240019.jpg


For this job, I use a screwdriver, wedged into the split in the ring. Then I twist the flat-head driver, and it will give me a bit of room. Then I insert my special tool, and spread it open the rest of the way.


Normal pliers work too, but require more cussing. :thumbup:

I'll show my method for re-crimping when I actually do it tomorrow. :beer:

Wilton Vises: To follow within a week or so. Got a nice C-2 for this demo.
Has anyone come up with any techniques for re-crimping the retention ring shown in post #2? Mjozefow mentioned posting his technique but I didn't see anything. I just finished restoring my Columbian vise and I'm having an awful time re-crimping the ring.

I was thinking about trying to heat up the ring with a torch but I'd love to hear any other techniques from the experts on this board.

Thanks!
 

amaes

Well-known member
Joined
Feb 8, 2012
Messages
60
Location
Chandler, AZ
How do you take the handle off a Starrett Athol No. 614


got it off the other day
 
Last edited:

coolreed

Well-known member
Joined
Apr 10, 2012
Messages
595
Location
Oklahoma City, It's a Windy Heat.
In order to remove the handle and threaded rod from this Prentiss 52 vise, I have to remove this fastener. How do I do that? I've never seen anything like this.

wa1013.jpg


I cleaned it up quite a bit and actually kind of like it like this. I'd like to grease the entire threaded rod better than I was able to but I will have to take the handle off to do that.

243lo2r.jpg


A friend of mine thinks it will rust real quickly again but it's so dry here that I find that hard to believe. I'm almost tempted to leave it like this and see if it does. Worst case...I wire wheel it again and then paint it. Thoughts?

I recently restored a Prentiss 22. The collar was fastened very similar to the way your picture shows. Which basically there were three places on the lead screw that had chisel marks deforming some metal up and fastening the collar in place. (Very crude). I also noticed the collar on my Prentiss 22 had a hole drilled and tapped in it but there was no set screw.

So I filed down the three chiseled marks and the lead was easily removed. After clean-up and paint I drilled and tapped the collar 180 degrees from the original hole. Marked the lead screw at the proper locales usig the colaar as a ref. and drilled into the lead 1/4" at those locales and used two (2) cone point set screws to lock the collar into its proper place, Making a proper mounted Lead Screw.
:3gears:
 

Matt in Va

Member
Joined
Jun 22, 2010
Messages
14
fwiw,
It's funny. I have 2", 4", and 6" Wilton Machinist Vises, all on swivels, from different eras. The 2" weighs about 4 pounds and is just a tiny version of the others. It is perfect mechanically but needs sand blasting and likely a powder coat. The 4" is my gunsmithing vise I bought new in 07' when I got out of school. The 6" belonged to my Father, May God Rest His Soul, and is also in perfect working order short of 30 years of grease. I MAY sand blast, judiciously, ALL three vises, file out all the dings on the 2" and 6" and have the set powder coated. The 4" has a little rust peaking through some spots anyway...

Looking at the 2" it is barely longer than my keys. Was a gift from a good friend...
side.jpg


front.jpg


back.jpg


Regards, Matt.
 

Matt in Va

Member
Joined
Jun 22, 2010
Messages
14
Matt, that 2" is the cutest little Willie I've ever seen. When you get tired of it, I'll buy it from you! Cheers, Bill

Bill,
I appreciate it, however, I think it's do for restoration and use. It is marked 12-46 so it has a bit of history along with it. Think I'll give it away to a deserving party when I'm done with it when my number is called....

Regards, Matt
 

phy6

Well-known member
Joined
Nov 18, 2007
Messages
275
Location
Maryland, It's a Wet Heat.
So far for paint I've heard:
  • Rustoleum etching primer with a top coat
  • Rustoleum engine paint
  • Rustoleum Hammerite

I started looking up 'Toughest Paint' online, what do you think about
  • Old school Dupont IMRON
  • Awlgrip (used on the bottom of boats)
  • Southern Polyurethane epoxy primer
  • POR 15
  • SPI Epoxy
  • Smoothrite
  • ionbond

I even had an idea about copper coating my little Parker 953-1/2 to prevent welding splatter from sticking. (like the threads on welding C clamps) Has anyone tried that?
 

Provincial

Well-known member
Joined
Sep 21, 2011
Messages
6,872
Location
Near Salem, OR
The toughest paint I've ever seen is the epoxy that Boeing uses on their jets. It is a light green and was made by Bostik years ago, then by Sikkens. I don't know who makes it now.

I have taken chrome moly steel that was painted with this and bent it 90 degrees at a 1/16" radius without the paint failing. No cracks or lifting! Beat it with a ball pein and it just dents the metal underneath. Expose it to exhaust heat from thin headers (not painted on the headers, just on structure within an inch away) and it just laughs.

I have never seen it a different color, so you'd have to like a light green vise.
 

MrMark

Well-known member
Joined
Jan 25, 2010
Messages
4,626
Location
Southern Cal.
How long do you all feel regular Rustoleum takes to dry enough to be put in service. The Can says dry in 24 hours, which is a bad joke. My experience so far is a week minimum to handle (after three decent coats in hot weather) and it can still be dented pretty easily with a fingernail. It does not sand at this point either.

So how long does it take to get hard? I don't remember the hammered paint being like this. I am talking the regular paint spray can paint here.
 

phy6

Well-known member
Joined
Nov 18, 2007
Messages
275
Location
Maryland, It's a Wet Heat.
How long do you all feel regular Rustoleum takes to dry enough to be put in service. The Can says dry in 24 hours, which is a bad joke. My experience so far is a week minimum to handle (after three decent coats in hot weather) and it can still be dented pretty easily with a fingernail. It does not sand at this point either.

So how long does it take to get hard? I don't remember the hammered paint being like this. I am talking the regular paint spray can paint here.

I've heard of people adding automotive paint hardener to the rustoleum, to hasten the process. I don't know how much you'd add though.
 

Outlawmws

Well-known member
Joined
Aug 9, 2011
Messages
39,285
Location
The Badlands
Has anyone come up with any techniques for re-crimping the retention ring shown in post #2? Mjozefow mentioned posting his technique but I didn't see anything. I just finished restoring my Columbian vise and I'm having an awful time re-crimping the ring.

I was thinking about trying to heat up the ring with a torch but I'd love to hear any other techniques from the experts on this board.

Thanks!

Late response, Those rings are pretty soft, so heat is not required. Depending on clearance, I used pliers or duckbills to get it started, and used a small chisel on each side as wedges to get opposed pressure if the stronger pliers wouldn't fit; I rotated it and kept at it until I got it seated all the way around.
 
To avoid these ads, REGISTER NOW!
Top Bottom