To avoid these ads, REGISTER NOW!

Big Little Garage, 30x34 attached

bggrnchvy

Well-known member
Joined
Nov 14, 2011
Messages
588
Location
Pleasant Hill, CA
I've been at work on this for a while, well over a year including the time spent getting plans approved. It started as a home for some equipment I was given from a late mentor's parent's and has evolved from there.

Here's where we are headed:


30' front and 34' deep but I lost 180sqft to a city imposed notch to adhere to the setback limits...as my sideyard is technically my backyard in their eyes. Instead of a 5/15 limit (5' minimum on side yard setback, but total of 15' between the two) that means a minimum 15' set back. I was able to fight it down a 12' setback, but it cost my some money and 8 months of back and forth.

The initial kick in the pants was the tooling I suddenly had in my care. A good friend passed unexpectedly in a sad accident several years ago and his father had mentioned he would hold onto my friend's equipment for me. To be honest I had kind of thought he was joking, and was happy to oblige in ribbing him back about letting me know when to get them. Well, he in fact did let me know as he was very serious. They were going to sell their house and the shop behind that had the tools in it so they had to go.

I arranged with two friends of mine that had also been good friends of our buddy that passed and we made a weekend trip and retrieved the mill and lathe 4 hours south of us. I had a contact at a rental company arrange for a forklift to be delivered to make it as easy as possible. It was relatively uneventful and the two machines have been stored in an enclosed tent for a while at this point.


Last edited:
To avoid these ads, REGISTER NOW!
OP
B

bggrnchvy

Well-known member
Joined
Nov 14, 2011
Messages
588
Location
Pleasant Hill, CA
To build the garage, I had to get rid of a fence, a shed, the current garage and the poorly constructed unpermitted addition on the back of our house. This is where I mention we bought this house because it was a basket case at a good price. I won’t delve into the remodeling that has occurred so far, but basically there’s a lot of issues and removing anything we can is helpful in that I can build it right.

Step one, the shed.


Insert Bobcat.


Bobcat smash.


There was a pretty big, while thin, pad under the shed. It took a few of these loads to the local concrete recycler and a few loads to the dump to be rid of all of it.

Next up, the fence.


A really good looking example of a fence beyond it’s prime.


I precut and fabbed all I could so we could knock out the install in a weekend.


Luckily my BIL and FIL are foundation drillers, we had post set in a couple hours Friday night. Saturday as an all day fitting and welding affair.


Saturday midday the boards were hung.
 
Last edited:
OP
B

bggrnchvy

Well-known member
Joined
Nov 14, 2011
Messages
588
Location
Pleasant Hill, CA


My plans called for some rem steel beams (and some new) I had found at the local supplier. Larger than my calcs said I needed, but much cheaper than the required pieces. I bought them up quickly since if I missed out on them, I’d be forced to buy new copies that would have been significantly more.


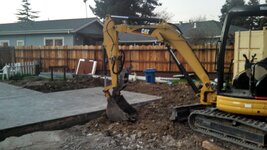
I secured a long term rental of a small excavator from a friend of a neighbor in return for storing it…and getting it running again (dead lift pump). I loaded it up on my trailer and prepared to demo the house.


I had quite a few people come out for the demo. I think they just wanted to break my house to be honest. My neighbor, the electrician moved power to my temporary pole. My BIL ran the mini ex. My buddies, the PM and field engr, were on the roof separating the roof line. It was pretty smooth.


I was left with an open space and concrete.


My BIL and I took turn trying to flop the miniex loading and moving concrete form the thickened edge.


The end result of piling the back rooms concrete. It was originally poured as a patio. Then a footing was dug around it and a room was put in on a raised foundation. Then the flat roof originally built had a peak added. It was quite interesting uncovering the progression.
 
OP
B

bggrnchvy

Well-known member
Joined
Nov 14, 2011
Messages
588
Location
Pleasant Hill, CA


It took a more than a week, but I loaded a 1 ton drw flat dump bed with concrete each night after work and dumped it at the recycler before work the next morning until the back room was gone.


The next step involved renting some items to help.


In short order we had open ground. I did end up having to replumb the whole house, as the incoming was through the garage slab. So I knocked out some walls and redid everything in copper and pex from the ceiling. Glad it’s done, but I wasn’t happy to have to do it then.
 
OP
B

bggrnchvy

Well-known member
Joined
Nov 14, 2011
Messages
588
Location
Pleasant Hill, CA
We were stalled for about a month between 2 weeks of rain and about 2 weeks for the expansive black clay to dry out enough to work it.


My BIL and I marked out the footings and shot grade through the night.


I had 23 tons of AB delivered the next weekend and rented a vibroplate.


My BIL was running the mini, while I worked the shovel and rake. Our friend the field engineer was out and shot grade all morning. My neighbor came by and ran the compactor. The base came out pretty quickly and very evenly.


I threw the excess in our other gated sideyard as we’d wanted to for some time. It just wasn’t feasible to get the yardage before easily. Compacted well and should keep the weeds from coming up and the mud down.
 
Last edited:
OP
B

bggrnchvy

Well-known member
Joined
Nov 14, 2011
Messages
588
Location
Pleasant Hill, CA
I had a heck of a time getting a concrete crew in. Everybody wanted as much to form/lay rebar/pour/finish as if they had to layout, grade, bring in base and compact. I was finally able to connect with a referral from my friend the PM. His guys were great, very professional, cost sensitive and had a great product. They knocked out all the work in a quarter of the labor estimate for man hours expected on my end.


I doweled the existing slab for tie ins.


Before they showed up the first day I threw down some vapor barrier/retarder/could help/might not/who knows 10mil stuff required by the building department.


They had it formed, rebar cut/bent/placed in less than 5 hours between 3 of them. Tying took a couple more hours.


I built the funny little cages for the two piers that hold up the ridge beam columns.


Just under 3000ft of #4 grade 60 bar. 12”oc and footing to slab tie-ins every 24”. Hopefully when it cracks it stays together and pretty level with the work on the subgrade and base.
 
Last edited:
OP
B

bggrnchvy

Well-known member
Joined
Nov 14, 2011
Messages
588
Location
Pleasant Hill, CA
Pouring day was yesterday, finally.


Had a small trailer pump out to make placement easy.


The first of three trucks was out early, so they started. Luckily my neighbors are understanding the city didn’t pay me a visit for starting too early.


The days progress in 4 pictures.

So that catches us up to the moment. The next week will be debris hauling and the beginning of steel fabrication to get the ridge beam up. Then onto framing.
 
OP
B

bggrnchvy

Well-known member
Joined
Nov 14, 2011
Messages
588
Location
Pleasant Hill, CA


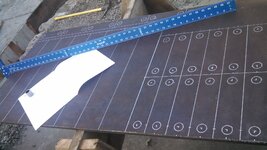
Grabbed a 2'x7' section of 1/2" plate to layout, mag drill and plasma cut all the brackets and gussets for the steel beams.

Still waiting on concrete to cure. It's been pretty cool, but dry since the pour. I've been soaking the surface down each night and morning. Constant standing water on the pad will hopefully allow it to get ultimate strength. I have plans to put the crane on it in a couple weeks to move the steel beams.
 

Riley

Well-known member
Joined
Feb 18, 2007
Messages
398
Wow!!

You are certainly getting after it! Amazing to see the sum of 50 or 60 years of home modifications...

Completely the right approach, getting it fixed right the first time. Nice having family and friends, both in the trades and willing to lend a hand.

Looks like a great project so far, I imagine it will continue to impress!
 
OP
B

bggrnchvy

Well-known member
Joined
Nov 14, 2011
Messages
588
Location
Pleasant Hill, CA
It has definitely been awesome to have so many people both able and willing to provide their expertise and help. I'm not a civil guy and the ground work alone was a pretty big learning experience for me. I'm enjoying the process and the satisfaction of working hard on almost every step.

IMG_20150124_162729_142_zps96848474.jpg

I drew all the brackets up and layed them in SW and then plotted that on the sheet of plate. I probably should have contracted a friends shop to just plasma them out, but instead I'm taking the hard route and mag drilling and manually plasma cutting them all out.

IMG_20150124_133905_474_zpsc59c6751.jpg

I borrowed a dump trailer for the weekend and hauled off another 8k lbs of concrete leftovers and 4k lbs of kitchen debris. My wife loaded most of it while I was working on other things.

IMG_20150125_173645_160_zps88076583.jpg

Just as the sun went down dirt started getting pushed back into the footings to level the lot back out. Nice not to have to run and jump over berms to get around anymore.
 
OP
B

bggrnchvy

Well-known member
Joined
Nov 14, 2011
Messages
588
Location
Pleasant Hill, CA
I had a few minutes last night in between other things to make a tiny bit of progress.


This is about the easiest way to bore a series of nicely finished holes in thick plate seeing as this isn't being shot out on a table. I thought about just gouging out the holes with the plasma, but I wanted a cleaner hole.


Chuck up the annular cutter in the mag drill, liberally apply cutting fluid and pressure and enjoy the smoke show. I didn't hook up the lube feed on the chuck as I didn't have the tubing and it was only a few holes.


The result is a pile of chips and these little 1/2" x 1/2" slugs.


Now I just have to drag the plate to an air source and burn these out.
 

CNGsaves

Well-known member
Joined
Sep 26, 2012
Messages
13,233
Location
KS and OK
Totally IMPRESSED with the awesome results you're getting and transformation from before & after (yet all on a reasonable budget). Your concrete preparation will pay off with long-term strength, especially in California where you might just have an earthquake tremor every now and then !! ;)

In for the ride, keep up the great work ! :thumbup:

P.S. That fence has to be one of the best I've ever seen . . . excellent !
 
OP
B

bggrnchvy

Well-known member
Joined
Nov 14, 2011
Messages
588
Location
Pleasant Hill, CA
Totally IMPRESSED with the awesome results you're getting and transformation from before & after (yet all on a reasonable budget). Your concrete preparation will pay off with long-term strength, especially in California where you might just have an earthquake tremor every now and then !! ;)

In for the ride, keep up the great work ! :thumbup:

P.S. That fence has to be one of the best I've ever seen . . . excellent !

Yes, I've been fortunate enough to have friends and family that seem to be able and willing to help at every turn, be it their expertise or tools.

I'm hoping to be able to get all of my strange wants and perks while sticking to a track home per square price by doing most of the labor myself and pulling favors which I can repay over the coming years.
 

Mcjohn925

Active member
Joined
Jan 5, 2015
Messages
37
Location
Concord, CA
Like others I'll be waiting for more progress pics. We are basically neighbors as I'm over in Concord. Keep up the momentum!
 

QwikKotaTx

Well-known member
Joined
Aug 10, 2013
Messages
967
Location
Seabrook, TX
Just to clarify, the old attached garage was removed from the house and you are building a larger garage in it's place? Is this also attached?
 
OP
B

bggrnchvy

Well-known member
Joined
Nov 14, 2011
Messages
588
Location
Pleasant Hill, CA
Like others I'll be waiting for more progress pics. We are basically neighbors as I'm over in Concord. Keep up the momentum!

Right on the side of the freeway.

Just to clarify, the old attached garage was removed from the house and you are building a larger garage in it's place? Is this also attached?

Yes, old garage and old addition behind it were removed and a larger garage is going in it's place. It will be attached, as the slab might indicate. Once steel is up I'll be starting framing which includes supporting the roof and demoing the existing wall between the currently open slab and the kitchen and living room as the new wall is 2x6 construction and 12' tall.

 
To avoid these ads, REGISTER NOW!
OP
B

bggrnchvy

Well-known member
Joined
Nov 14, 2011
Messages
588
Location
Pleasant Hill, CA


Loaded up the plate, some tools and the saw horses and had my wife drive over to her brothers house around the corner. I don't have any reasonable CFM air to run a plasma and he does, so it was an easy choice.


Got to cutting. I forgot how much I dislike manually cutting thick plate, especially that many linear feet.


I was left with a pile of rough chewed out peices and got to work knocking off the slag and cleaning up the nitrided edges.


I finished for the weekend by dragging out all my beams form the sideyard with the miniex and getting them in the driveway. I have to drill the flanges for bolts to mount 2x6's to them to unitize the framing and the steel. They also need to get welded out and painted prior to being set in place.
 
OP
B

bggrnchvy

Well-known member
Joined
Nov 14, 2011
Messages
588
Location
Pleasant Hill, CA
Spent some time with the mag drill again yesterday. I had to bore all the holes on the W beam flanges to mount the 2x6 framing to.


Chewing along making buckets of chips.


I got most of them done, both sides and debured.


Just have this 29' W10x26 beam left and the W24x78 needs a few. Pulling the W24 out though will require the crane. The little miniex doesn't much care for the 2800lb beam.
 
OP
B

bggrnchvy

Well-known member
Joined
Nov 14, 2011
Messages
588
Location
Pleasant Hill, CA
I know that area. Hope everything weathered this storm decently over the weekend.


Sent from my HTC6500LVW using Tapatalk

I was up until just about midnight waiting for the winds to die down. I had to add a skirt to the my wall to keep the water from pooling on the slab and then wicking into the house. Really glad we haven't replaced the floors in the living room as they get a bit damp. The winds kept flipping over the 2x12 I laid down to hold the skirt to the ground even after I put a couple pavers on them.

In any case, it turned out ok. It will get a little time to dry out.

I started painting the beams on Saturday, but didn't get far. I'm using a gallon of Rustoleum red oxide primer and thinning it 30-40% with acetone and rolling it on. It works really well, covers quickly and with the added acetone the coats dry reasonably even in the lower temperatures.

I'll be off this project until Monday next week though. My dirt bike needs a little attention and we've got a trip upcoming.
 
OP
B

bggrnchvy

Well-known member
Joined
Nov 14, 2011
Messages
588
Location
Pleasant Hill, CA
This last weekend was a long one.

Got home from work Friday and the wife started painting some beams while I marked out and drilled all the anchor holes for the beams. Glad I had a Relton rebar cutting bit. I happened to hit rebar in 6 of 16 holes. I managed to epoxy set 10 of 16 B7 studs until I totaled the cheap caulking gun I was using to dispense it.


Small beams all dry the next morning.


Saturday morning starting point. I went to HD and they swapped the gun and I grabbed more epoxy. Then proceeded to wipe out the new gun in short order as well. We grabbed a big clamp and made it work.


My BIL and his buddy were over operating and helping prep beams. My wife was busy helping doing final fitup of the tabs for the beams. Mostly putting a heavy bevel radiusing two corners. She also painted one half of the W24x84 beam after we pulled it out with the crane.


I spent most of the day welding and flipping beams.


My BIL and I stayed up and finished welding out the beams we could Saturday night so we had less to do Sunday.


Before we were done though, we set the front 3 beams. Of course the only shot I have is of Sunday morning first thing:


Sunday's progress was hard fought. I welded out two ends on the ridge beam, then my wife painted the other side of the beam and we flipped it. Once it was flipped Kurt and I knocked out the 18 holes on the top flange to attach the future angled sill plate to land the rafters on. Then came welding the other 2 caps on.


I also welded the small column atop the front horizontal beam.

By the end of the day the only other beam that went up was the back beam, which will directly accept the ridge beam atop.


Our friend around the corner, the field engr had spent Saturday grading out the backyard which had a big hole from a removed and ground tree as well as the piles form digging the footings. My BIL then used the open space to teach our other neighbors youngest how to run the miniex, hence the small person aboard.

Which leads us to this morning:


I have to shim and grout the columns to true them all up and we'll hopefully be setting the last two beams and welding them in place this week.
 
OP
B

bggrnchvy

Well-known member
Joined
Nov 14, 2011
Messages
588
Location
Pleasant Hill, CA
We got the forward horizontal beam set last night.


A few too many chiefs and too little daylight to set the ridge beam, but it's on the schedule for this evening.
 
OP
B

bggrnchvy

Well-known member
Joined
Nov 14, 2011
Messages
588
Location
Pleasant Hill, CA


We started the evening here.

I braced the back beam in two directions being it's not tied into the framing yet, being it doesn't exist first. Then we prepped the ends of the columns for welding, being we all forgot about that small step. Nothing like running a wire wheel while on a ladder 18' up leaning on a structure that's still moving a bit.

Then my BIL got on one side and I got on the other to align the beam and we made the pick. The crane didn't even notice the beam was there until about the last couple feet. It started to move a little, but we were still in green. We got the beam on top and with a little fine persuasion with a 8lb sledge to get it just right it got burned in.


Some gussets got burned into the lone beam in the back and some more will go on the front structure this weekend prior to climbing all over it again and touching up the primer we removed.


This is were we stand as of this morning, steel all up. Lumber including 2x6's, 2x4's, TJI's, and 1/2" CDX all shows up Tuesday. Then it's time to demo and rebuild the wall attaching the house so my wife can start her kitchen plans.


Mcjohn925

Active member
Joined
Jan 5, 2015
Messages
37
Location
Concord, CA
Wow, that's gonna be tall. How are the neighbors feeling about this now, lol

Sent from my HTC6500LVW using Tapatalk
 
OP
B

bggrnchvy

Well-known member
Joined
Nov 14, 2011
Messages
588
Location
Pleasant Hill, CA
Wow, that's gonna be tall. How are the neighbors feeling about this now, lol

Sent from my HTC6500LVW using Tapatalk

There are probably 7 or 8 second story additions in the neighborhood, all taller than this will be. Part of my deal to build this is the exterior finish will match the rest of the house and the neighborhood.

Actually, being this was an exception to zoning code (setbacks in two corner spots), everyone in a 100 yard radius got a letter inviting them to request a zoning board meeting if they had concerns or were strongly against any part of the project. Nobody did.
 
OP
B

bggrnchvy

Well-known member
Joined
Nov 14, 2011
Messages
588
Location
Pleasant Hill, CA
I took a couple days off from my j-o-b to work at my other j-o-b, the house.

Of course I picked the one weekend out of 6 that most of my best help was busy with their own trials and tribulations. As a result Saturday, Sunday and Monday were two man shows and Tuesday I had 3 guys and myself. We still managed to get done more than I had slated.


Saturday consisted of cutting the roof line back, supporting the joists and rafters and then removing the wall and kitchen which would be cut a little shorter by the wall going back in.


Sunday and Monday were spent erecting the wall attached to the house, throwing up some rough shod drywall in the living room to enclose the house again and reattaching all the joists to the new wall. This would be my first time framing a complete big wall like this. Some mistakes were made. And yes, the second top plate and all the cross/fire blocking still has to be added.

At the same time my wife and a pile of neighborhood kids removed all the drywall in the kitchen and tore up all 3 layers of linoleum.


Before.


New plan.

I made the decision to rebuild the roof line from the house side. We're going to extend the highest peak into the new shop roof. The two biggest gains will be the lack of a low spot against the shop wall in the back asking for water damage and adding a nice place to put the AC condenser on the roof where you can't see it easily and above a non-living space. I have to reroof anyways and a lot of the 1x6 underneath is mediocre shape so the actual investment won't be much more. It also is a bit better visually to tie the house in the shop. No, colors aren't for sure, and everything grey isn't going to be.


Tuesday I spent the morning getting up plastic on the house as we were expecting some water this morning (Weds) and cutting studs and trimmers. About 2pm three of my buddies all showed up and we managed to get the back wall framed up to the bottom top plate. Image is from this morning after some water obviously.

Hoping to get another wall going before the weekend working in the evenings. It's supposed to be pretty warm, upwards of 80*F.
 
OP
B

bggrnchvy

Well-known member
Joined
Nov 14, 2011
Messages
588
Location
Pleasant Hill, CA
Back on this the last few nights just my wife and I after work.


Got the big wall with the reclaimed window from the backroom framed on the ground. Need to through the second sill plate on and drive the excavator around to put it in place.

Hoping to have the other two small walls done this weekend and maybe start redoing the roof line on the house.
 
OP
B

bggrnchvy

Well-known member
Joined
Nov 14, 2011
Messages
588
Location
Pleasant Hill, CA


I spent Friday night cross blocking the big wall I had on the ground and fitting the second top plate.


Saturday I rigged it to the mini ex and with a couple guys we hoisted it up on to the anchors and got it bolted down. I built the small wall adjacent with the rest of my afternoon and put that up too.


Sunday I built out the last full wall and we put that up as well. My wife and our neighbor cross blocked one row on the wall behind, attached to the house. I still have to finish the tie-in to the steel on the right, but I need to drill the plate atop the horizontal beam to bolt it in to do that. The walls are racked by about an inch right now and I'll use the mini ex to convince them into place.


Getting there.
 
OP
B

bggrnchvy

Well-known member
Joined
Nov 14, 2011
Messages
588
Location
Pleasant Hill, CA
The last week has been spent mostly helping my wife prepare for the 110 person bbq she threw for her brothers coming child. A little work got done on some under eve conduit runs for cameras as well, but hardly anything on the shop.

I had a couple hours Sunday morning and ended up putting fender washers under the standard washers on every carriage bolt I've already installed :/ The oversized hole in the steel and the washer OD wasn't giving me warm fuzzy feelings as it were so before it eventually gets covers up on the external sides I thought I'd fix it. I also bored some holes in the rear most column flange and predrilled the header so I could lag it in and prevent it from walking in the event of an earthquake.


Back to framing this week.
 
To avoid these ads, REGISTER NOW!
Top Bottom