To avoid these ads, REGISTER NOW!

The South Pacific tin shed

Guster

Well-known member
Joined
Mar 11, 2012
Messages
1,543
Location
Auckland, New Zealand
Have to start somewhere:
My workshop came about as a need for prototyping and general fabrication. Doing part time work and repairs on paintball equipment, boats, props and costume accessories etc. pretty much paid for it over time gradually upgrading to larger machines as I went. Life changed with family and career so that now I’m pretty much only doing fun stuff for myself. I still get involved in a little commercial design and prototyping consultation now and then. You get to learn new things and it keeps the mind sharp. Recently went back to my roots with electronics, programming and motor control and hope to get into more CNC over time.

General warning: no clocked screws or consistent immaculate surfaces here.
My two biggest moderators are time and money. These days I choose to spend more time with the kids. They’re at that fun age where adventure can be encouraged and going to the beach every day is still fun. It does mean I have let the workshop go a bit and I choose not to work on the cars as it is cost and time efficient. Though I will mess with the vehicles a little now and then. I'm also happy to walk away from a mess or leave things half finished when life calls. I do worry this thread could suffer a similar fate at times. You'll rarely see clean workbenches. There is always a bit of home renovation going on and it often means that the workshop becomes temporary storage for stuff. On the other hand there will be some unusual projects – maybe a little different from the main course. Ranging from electronics, machining, welding and composite construction. Definitely some attempts at woodworking too. I’m not that good at taking photos as I go, so this will be an interesting challenge. I won’t be surprised of things side-track, go on hold, divert or return to original challenges from time to time. Hence I won’t mind having my thread hijacked a little from time to time.

The workshop:
The garage consists of a 5.5m x 6m, 80’s era kitset building with 2 roll-up vehicle entry doors and a man door on the side as it was when we bought the property over a decade ago. Due to the terraced nature of the land it was built too close to the house. In fact you can only get a vehicle into one of the doors as the other is blocked by the house. I demolished the built-in workbench, repaired the concrete floor they didn’t finish under it and added lighting, power points around the periphery and moved the breaker box while replacing some of the internal chipboard panelling. Because it is also used to store some camping, sporting equipment and other stuff I removed the large steel shelving I originally made and built and overhead mezzanine instead.
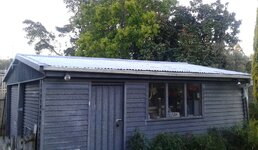
33691891736_b5f03a1d0b_b.jpg

Yeah the gutter is wonky. I 'bent' it last time I was on the roof.

Like many here on GJ the storage of non-workshop related stuff and raw stock is my biggest challenge. Another is that the roof is very low pitch and with the 2m ceiling height it limits the usability of my milling machine and gantry crane too. I have been planning to raise the roof 200mm though the roofing is showing signs of the galvenising breaking down with little patches of surface rust. Nothing a bit of cold galv won't fix for now but it presents me with other options. Like changing the entire roof to a single pitch design giving better clearance on one side and replacing all the roofing in the process.

There I've done it... the start of a thread. :thumbup:
 
  • Like
Reactions: DSS
To avoid these ads, REGISTER NOW!

hewey

Well-known member
Joined
Sep 5, 2014
Messages
1,681
Location
Blue Mountains, Australia
Welcome mate. Sounds like you have a pretty healthy approach to life. You'll have to share some pics of your previous projects, sounds like you do an interesting range of things.
 

oldironfarmer

Well-known member
Joined
Jun 25, 2016
Messages
6,664
Location
Terlton, Oklahoma
WOW! And I almost commented on another thread this morning that it's about time!:rocker::rocker:

It must be exactly time!:rocker::rocker::rocker:

Thanks for starting your thread. Now when I'm hacked off at the world I'll know where to come a throw darts...

I put popcorn on the shopping list so I'll be sitting here with a bowl of popcorn enjoying the discourse and information. You've got a lot to offer and I've got a lot to learn!

Congratulations!!
 
OP
G

Guster

Well-known member
Joined
Mar 11, 2012
Messages
1,543
Location
Auckland, New Zealand
Welcome mate. Sounds like you have a pretty healthy approach to life. You'll have to share some pics of your previous projects, sounds like you do an interesting range of things.

Thanks Hewey. I should mention my 3rd moderator and SWMBO keeps me honest if erm… when I frequently slip up. Once I get into the flow it is easy to forget the world and lose track of time. Especially behind a welding hood or watching a machine run. Just have to remember to always turn the argon off along with the lights. ;)

I do plan to start with a little of what I’m up to right now and fill some time with some tales of the past. Seems to be a popular combo on GJ. Otherwise I am happy to take hints on what people may want to see more of. Whether it is of interest, well, that may be a challenge. If most friends and work colleagues faces are anything to go by, my interests and theirs are on paths that only cross when they need something fixed.


WOW! And I almost commented on another thread this morning that it's about time!:rocker::rocker:

It must be exactly time!:rocker::rocker::rocker:

Thanks for starting your thread. Now when I'm hacked off at the world I'll know where to come a throw darts...

I put popcorn on the shopping list so I'll be sitting here with a bowl of popcorn enjoying the discourse and information. You've got a lot to offer and I've got a lot to learn!

Congratulations!!

I’m flattered and very humbled Andy. Think it is time I give back for all I’ve learnt from you guys too. Always up for a game of darts.

Was tempted to wait till Saturday morning to post. Seemed like a good date for a bit of a laugh. :lol:
 
OP
G

Guster

Well-known member
Joined
Mar 11, 2012
Messages
1,543
Location
Auckland, New Zealand
One problem with these metal clad workshops is that they basically act like a faraday cage. That means that there is no electromagnetic signals in or out of them. Problem is you added a tablet to your workshop for some purposes and then also want to spin up some music over Wi-Fi.

This puzzled me for a bit till Ashleigh, my wife, complained that she had poor Wi-Fi reception while trying to read her kindle from the hammock in the back yard. Bit of a eureka moment when I realised that many Wi-Fi repeaters have two aerials. Meaning I can have one outside and one inside the workshop. Just had to find a repeater with screw on aerials and a little extension cable. The rest involved a hole in the cladding and some leftover plastic conduit parts to hold one of the aerials outside.

Hence the “walking stick” on the front of the garage.
33691892556_d753f1f582_b.jpg
 
OP
G

Guster

Well-known member
Joined
Mar 11, 2012
Messages
1,543
Location
Auckland, New Zealand
My current project is a continuation of building my own kite hydrofoil. I am pretty much into anything involving getting dragged around by the wind. I used to skydive too and have not taken up paragliding yet so mostly any form of sailing and kitesports. I have been kitesurfing pretty much since it was a thing and before it was really considered safe either.
Me back in 1999…
33741263335_048f4f8f22_z.jpg


The idea behind a hydrofoil is basically using a small wing in the water under the board, not too different to that on an airplane to provide lift. One benefit is that drag is greatly reduced and because the lift counterbalances your weight it also reduces the force required to provide propulsion. Riding it requires a fair amount of skill and has been described as trying to ride a unicycle on water. I built my first foil after building some new kite boards about 18months ago though only recently had more time to get out in the water on it more frequently. I broke some front wings(or foils) due to not being deep enough and striking the sea bottom while I was learning. So the current foils are my fourth iteration. I also use every consecutive build to try something new or improve something in the build process. I don’t worried about prototypes breaking as that is part of the process of studying failures etc. We’re on a journey here…

Primed composite parts:
33741262985_2f41c3f43b_b.jpg


Foil attached to a board sitting upside down on trestles next to a repaired race board:
16507383326_32011f14f7_b.jpg


I have recently been acquiring more materials to build a whole new unit. After picking up some composite materials on Saturday, I built some molds or bucks for vacuum bagging the foils to.

Ithcy collection of 460oz double bias carbon fibre, 420oz double bias fibreglass tape on a roll, 3oz fibreglass and some peelply:
33618581281_6386b79233_c.jpg


New ing cores prior to being shaped sitting on newly made molds:
33741262565_b27b9d118f_b.jpg


The mast foil – tall upright section that connects the hydrofoil to the surf board - has been shaped out of cedar and working with cedar using a handplane was a very nice experience and so much easier to clean up. Will be working on the rest this weekend so more photos to come.
 
Last edited:
OP
G

Guster

Well-known member
Joined
Mar 11, 2012
Messages
1,543
Location
Auckland, New Zealand
I’ll go into more detail about the whole vacuum bagging process as I make the parts. Except to explain that it is a cheap and easy way to improve consolidation in the composite lay-up and can help remove a little excess resin to optimise the strength:weight ratio. All by simply relying on the absence of one atmosphere of ambient pressure.

One thing I have never really addressed is my vacuum pump setup. It mainly consists of a rotary vane pump and I added a reservoir to improve its efficiency. Otherwise it is a mess of fittings a tubing to do the job. Given that I only use it every 2-5 years it has hardly changed from when I first started using it other than replacing the perished tubing as needed.
Vacuum bagging an early kite surf board circa Y2k - same pump setup on the left:
3541470987_deb9313774.jpg


One problem with this setup is that if the setup leaks you need to run the pump continuously until the resin is set. Since we are limited to some things vacuum switches and regulators are very expensive. Very expensive.

My alternative idea was to make an adjustable mechanical regulator that trips a switch when the desired pressure is attained. This is not perfect as the pump could reach the desired pressure in a short period creating a short hysteresis loop. So much that the pump can switch on and off in short bursts which is not good for any pump. My idea was to use something like an Arduino to take the regulator as a sensor input and add programmable timing so that delays the pump start so it runs for longer periods at a lower frequency to recover lost pressure.

Earlier this week I came across a Panasonic DP-101 digital vacuum pressure switch on aliexpress for NZ$40. Same part will cost me nearly NZ$500 if bought locally. The part should arrive next week and save me all the hassle of making a regulator and parts to run the Arduino, relay etc. So the current plan is to build a dedicated cart to hold the reservoir and pump with a panel for the gauge and pressure switch. Along with a manifold with some valved inputs so I can run more than one vacuum line at a time. Thanks to some influence from Chris over at Post Recession Shop Rehabilitation Project

That’s it for today. More later…
 

oldironfarmer

Well-known member
Joined
Jun 25, 2016
Messages
6,664
Location
Terlton, Oklahoma
Cool stuff!

I guess the bigger the vacuum reservoir the slower the pump cycles. My farm solution would have likely been a needle valve to provide a small leak to reduce the pump efficiency. Not very elegant.

What rdo you know about eductors as vacuum pumps? I've been considering using an eductor for vacuum degassing (short duration compared to veneer).
 
OP
G

Guster

Well-known member
Joined
Mar 11, 2012
Messages
1,543
Location
Auckland, New Zealand
That is correct and if you notice the pump there is a little yellow knob under the hose attached to the pump which is exactly that... a leak down needle valve. Also good where you need vacuum but not all of it like when working with softer foam or honeycomb cores.

Do you mean the little ones they make specifically for that purpose? The ones often called vacuum generators which are attached to a compressor line or an actual industrial eductor normally used for mixing different media? Don't know much about the latter other than needing a pretty decent sized rotary vane pump to keep up with it. The little vacuum generators on the other hand are a similar means for premature compressor wear in a DIY concern. They are used in industrial setups too but the flow rate through them is minimal compared to the entire plant they are often used in like bottling, packaging and product handling.

If you feel thrifty and suitable motivated I would suggest using a left over fridge compressor instead. Provided it is still running, has oil in it and you can trap the oil from the output and return it to the pump it is actually quite a decent vacuum pump. This was my first pump and more than good enough for reaching good vacuum.

My main degassing tank is an old pressure cooker. :)
 

oldironfarmer

Well-known member
Joined
Jun 25, 2016
Messages
6,664
Location
Terlton, Oklahoma
Somehow my dad's HVAC vacuum pump got away in his old age. Probably a helpful friend :) We couldn't find it among his tools. I've thrown away lots of old refrigerators over the years. And I'm not sure the new ones are as good. Used to be the old belt driven compressors. I need to try a new pancake compressor the next time I replace a rent house refrigerator. I guess I could try an automotive A/C compressor. I've probably got a couple of those.

Although I don't want to ruin my shop compressor, it is rated for a 50,000 hour life, and I really don't expect to use a vacuum pump that much. I may have to build an eductor and try it out. I've looked for design guidelines but they weren't very helpful. Trial and error is cheap.

Funny I have an old pressure cooker as well...
 
OP
G

Guster

Well-known member
Joined
Mar 11, 2012
Messages
1,543
Location
Auckland, New Zealand
Those little pancake fridge compressors are great for doing a little degassing. If the flowrate is an issue, a reservoir with a valve can make all the difference to pull a large volume quickly. A few woodworkers also using it for vacuum chucks or other vacuum clamping if the seal is good.

Alternative source for a tidy little rotary vane vacuum pump are the ones used for replacing or topping up refrigerant in fridges and airconditioning units. Mine is just a slightly larger version of those that came from a lab.

Small eductor is easy to build if only you had a little chunk of aluminium to play with. Might even be able to tweak a venturi injector if you can find one. I seem to recall Harbour Freight selling them as vacuum generators ready to use with all the fittings for next to peanuts every now and then going by other forums I frequent.
 

dlcwent

Member Emeritus
Joined
Feb 24, 2014
Messages
8,427
Location
coastal maine
Well I've been wondering and waiting for you to finally pull the trigger and start a thread. I'm glad you finally did it.:thumbup: I'm overjoyed that there won't be and photos of clocked screws. I think we should let 1/2 cup have all that fun. And I'm pretty much the same way when it comes to taking photos. After I get the project done I think, "Oh I should have taken some picture to show the guys." Well maybe we can both work on that concept. And I want to thank Andy for putting a link in his sig line or it might have been months before I stumbled across this thread. Glad you did it. I'll be hanging around if you don't mind.
 

1/2 Cup

Member Emeritus
Joined
Apr 28, 2012
Messages
19,283
Location
Shepparton. Victoria. Australia
Guster, there is no turning back now:bowdown:

PS despite what others may say you can show pictures of unclocked screws...:lol_hitti

Looking forward to following your exploits..:thumbup:
 
Last edited:

Bob Heine

ALLIANCE MEMBER
Joined
Oct 24, 2009
Messages
10,708
Location
Boca Raton, Florida
Oh dear, I'm late to the party. I expect I will get a little less done every day now that I have a subscription to this thread. I expect you will both regret and enjoy this process and I for one am looking forward to following along.

Hmmm kite surfing in 1999 and still at it today. That's wonderful! I started water skiing in 1967 and gave it (and the boat) up in 1985. It was a lot of fun but as I got older, recovery time from the strain on my elbow was longer and longer.
 
OP
G

Guster

Well-known member
Joined
Mar 11, 2012
Messages
1,543
Location
Auckland, New Zealand
Well I've been wondering and waiting for you to finally pull the trigger and start a thread. I'm glad you finally did it.:thumbup: I'm overjoyed that there won't be and photos of clocked screws. I think we should let 1/2 cup have all that fun. And I'm pretty much the same way when it comes to taking photos. After I get the project done I think, "Oh I should have taken some picture to show the guys." Well maybe we can both work on that concept. And I want to thank Andy for putting a link in his sig line or it might have been months before I stumbled across this thread. Glad you did it. I'll be hanging around if you don't mind.

Thanks DLC. I just meant that this is might be less ‘artisanal’ and more get’erdone and paying money. I appreciate that folks take the time and care to clock stuff. I did slip up today… but at least I took a photo in the end. More on that later.

Andy is good that way. Kept me to my word too. Thanks Andy, Lyndon, Bob and everyone else who nudged.

There you go Guster, off and running. :thumbup:

GB

Cheers Grumble.


Guster, there is no turning back now:bowdown:

PS despite what others may say you can show pictures of unclocked screws...:lol_hitti

Looking forward to following your exploits..:thumbup:

Yup, every stain, dust bunny and swarf pile ready for inspection! Let’s just get those screws in tight without splitting wood or breaking heads off for now. Either way, I use those square drive screws so it won’t stick out like a sore thumb.

Thanks 1/2 Cup. Hope I can muster up to GJ standards.


Oh dear, I'm late to the party. I expect I will get a little less done every day now that I have a subscription to this thread. I expect you will both regret and enjoy this process and I for one am looking forward to following along.

Hmmm kite surfing in 1999 and still at it today. That's wonderful! I started water skiing in 1967 and gave it (and the boat) up in 1985. It was a lot of fun but as I got older, recovery time from the strain on my elbow was longer and longer.

Hardly. We are still on page1! I just did a little bundle post to kick things off.

I don’t have as many Saturdays as you and Andy. Hope to not distract you as much as lazy Andy does. Either way the ups don’t come without the downs and they both influence us equally in life – or more like what doesn’t kill you teaches you some new tricks and how to hide the evidence.

Thanks Bob!

I’m impressed, skiing can be hard on the arms. I used to do a little slalom when I was younger and those flat turns did a number on my shoulders. Actually just came back from the beach. First time trying my hydrofoil in the waves – it was an absolute disaster! But my sinuses are clean and I’m dead keen to get back after some adjustments. I will feel it tomorrow but that might be partially due to helping the neighbour pick up and move a ton(literally 1000kgs) of 200mmx50mm retaining timber. He doesn’t have a towbar so I offered to tow a trailer for him.

Before coming to NZ I had been an avid skydiver. Made a few life choices when I arrived in 1997. Partially because I was flat broke at the time. First decent job was down the road from a kite shop. I had already been playing with powerkites as it was something fun to do when it was too windy to skydive. Shop owner introduced me to kite buggies and bigger kites. That is how I ended up with my first set of powertools. Welder, grinder, hacksaw etc. I had to make one.
Not the best but it worked.
2436428505_56d0a87167.jpg


This was a much later design built from scratch for getting into the 100kph club:
8078400324_c73e868f4f_b.jpg


Early stages of testing:
3733660498_899f814859_z.jpg


Might even have enough photos to do a little photo essay.
 
OP
G

Guster

Well-known member
Joined
Mar 11, 2012
Messages
1,543
Location
Auckland, New Zealand
I have been on a little mission. Part eco-friendly and part longer term cost savings. Started swapping out lights and light fixtures for LED lights.

One of the bigger challenges as some of you may have found is how hard it is to get a good performing replacement for those 200W-300W halogen lights. We have one of those up-lights that create a very nice atmosphere in the lounge. Good enough to read by and not so bright or sharp as to be annoying when watching movies.

This uplight was giving us trouble anyway. The globe contacts kept corroding and arching. This would overheat the pulse width modulated dimmer circuit and either blow the fuse damage the circuit board over time. It is about 17 years old and I had repaired it every 6 months or so.

Last week I bought a larger dimmable 1200Lumen, 3000K LED panel light, normally used as downlights. Idea was to use part or all of it. This morning I started taking apart the light and cleaning it – great selection of crispy fried bugs as usual. The plastic panel below the ‘bowl’ was badly perished by age and heat so I cut a new piece out of scrap perspex and frosted it using a random orbital sander. Then I cut a large hole in the back panel to get the most light out of it. Turns out the constant current/voltage DC supply for the LED does not play well with the PWM dimmer so I replaced the dodgy old thing with a straight switch.

Still need to affix it inside the bowl but the light is good enough to satisfy the lady of the mansion so it is good enough for me.
Ta-Da!
33787094505_108d18c460_b.jpg
 

1/2 Cup

Member Emeritus
Joined
Apr 28, 2012
Messages
19,283
Location
Shepparton. Victoria. Australia
Guster, just awesome.:bowdown:

I could never bring myself to jump out of a perfectly serviceable aircraft.:scared:

I tip my hat to you..:bowdown:

As for a GJ standard for a tin shed, when it comes down to it, there is no standard let me tell you.. it is what it is and how you like it..

PS next time you are over the ditch check mine out it is no show pony but it works for me..

Regards
 

Bob Heine

ALLIANCE MEMBER
Joined
Oct 24, 2009
Messages
10,708
Location
Boca Raton, Florida
Guster, I have also been upgrading lighting to LED. It was an epic fail at first. The claim that they would last for decades turned out to be a lie. The first ones I installed lasted months. I tried again two years ago, replacing the halogen floodlights in the kitchen with dimmable replacements that also sealed the high hats. Most recently I replaced all the bedroom fan lights and 3-way bulbs in the house with LEDs. We're on a budget plan that averages our costs so I'll wait a few more months to analyze the savings but it looks like at least a 10% reduction.
 
OP
G

Guster

Well-known member
Joined
Mar 11, 2012
Messages
1,543
Location
Auckland, New Zealand
Guster, just awesome.:bowdown:

I could never bring myself to jump out of a perfectly serviceable aircraft.:scared:

I tip my hat to you..:bowdown:

As for a GJ standard for a tin shed, when it comes down to it, there is no standard let me tell you.. it is what it is and how you like it..

PS next time you are over the ditch check mine out it is no show pony but it works for me..

Regards

Jumping is easy. It is more the fear to let go than fear of heights and I do have a healthy respect for heights. :lol: You do lose depth perception over a few hundred feet and it only comes into effect again as you approach your landing. By then you are focusing on the landing and it is over in a few seconds. :thumbup:

Letting go was not an issue as our pilot was crazy mad. If you took too long he would help you along by gently tipping the plane just to let you know it is time to hurry up. However when I was still into skydiving we had maybe one canopy malfunction every 6-8 months. This was even with me packing the one I used to keep up with jumping up to 4-5 times a day. I never had any issues in almost 200 jumps but had seen a few while I was jumping – less than a handful in total. First trip out to go check out a club here in NZ there were 2 ‘line overs’ during the 6 hours I was there and I just wasn’t happy with procedures. Line overs happen when one of the bridle lines got wrapped over the top of the canopy and ultimately you have to release it and go to the reserve chute. I made the call to quit that day and haven’t jumped since.

I agree, the shed is what it is. Right now, I take guidance from SWMBO on where investment goes. Maybe once I renovate our kitchen I will be allowed more leeway. I was more critical to the goings on in the shed. You guys set a tough standard to follow. I do visit the Shed Downunder on a regular basis. Another thread like 12 Gauge and Restored 1930’s where I just can’t always contribute as the quality and tidiness is above par for me. I think I’ve only had the opportunity once when you were looking at TIG units and considering to get one like mine. :thumbup:

As for dropping by in person, I would absolutely love to – thanks for the invite. Right now work has a travel ban(read cost reduction drive) but I was thinking that next time I split the trip and delay the return flight so I can spend more time, catch up with family and do a ‘GJ Downunder tour’.

Guster, I have also been upgrading lighting to LED. It was an epic fail at first. The claim that they would last for decades turned out to be a lie. The first ones I installed lasted months. I tried again two years ago, replacing the halogen floodlights in the kitchen with dimmable replacements that also sealed the high hats. Most recently I replaced all the bedroom fan lights and 3-way bulbs in the house with LEDs. We're on a budget plan that averages our costs so I'll wait a few more months to analyze the savings but it looks like at least a 10% reduction.

That is why I waited this long, allowing for a bit more market maturity and went for fixtures rather than just bulbs. That and some deals. I could have kept the old recessed can light fixtures but they were nasty too. Got complete sealed IP44 rated units with integrated supplies. Did a bulk order on a deal that got me 10 units for the price of one retail unit via a local distributor getting rid of last year’s stock. The target was to replace all the 150W spot lights outside, similar to the ones on the outside of my shed picture. Just happen that they work well in the hallway and lobby that had can lights with those 150W spot light bulbs in them. Unfortunately the cutouts in the lounge turned out to be larger and didn’t like the look of the adapter plates so I got two of those compact panel lights with a similar output rating though they have separate power supplies. They also gave me the idea to modify the uplight due to being so compact.

In the kitchen and dining room I got a similar deal on 2x Philips(ceiling oyster) fixtures. Except for the master bedroom the rest of the house has already been converted to low watt CFL’s so no immediate rush. The bedroom is only on hold till we can reach settlement between cost, form and function. Right now I am leaning towards two lower output panel lights with independent switches.

Biggest consumer is still the hot water cylinder anyway. I am considering gas on tank and two smaller on demand heaters for the bathroom and kitchen. Slight reduction in overall cost but break even when considering the cost of a new inverter hot water cylinder. Though either option gives me high pressure hotwater again which is what I would really like. My little hot water pressure booster pump makes it just barely liveable right now.

At least so far I have avoided drastically modifying anything, having to get into the roof crawl space or spending too much. The other noticeable difference other than the fact that the ceilings are now fully sealed is that the lights don’t attract bugs due to the high frequency ‘flickering’. Last few evenings have been very humid and with the doors open we’ve had no mossies in the house. :thumbup:

Otherwise, in it for the loooong game. I already spent about NZ$250 so far and will only make a return on that over a few months. Though it looks much better and we now use lights that were found to be annoying or limited in the past.
 
To avoid these ads, REGISTER NOW!

BBChevro

Well-known member
Joined
Jan 24, 2014
Messages
2,235
Location
Brisbane, Qld., Australia
Just what I need Guster, another thread to subscribe to - just when I'm trying desperately to catch up on all my favourite threads. :willy_nil


I have recently been acquiring more materials to build a whole new unit. After picking up some composite materials on Saturday, I built some molds or bucks for vacuum bagging the foils to.
...

Does the vacuum bagging do away with the need for rolling/squeegeeing? (is "squeegeeing" a word? - it doesn't look right. :headscrat).


...
Ithcy collection of 460oz double bias carbon fibre, 420oz double bias fibreglass tape on a roll, 3oz fibreglass and some peelply:
33618581281_6386b79233_c.jpg

...

Disposable gloves are your friend grasshopper - as well as an isolation from the nasty itchy fibres, it means you don't have to bathe in Acetone to remove the resin from your fingers. (paper cuts = :scared::shocking:).


...This was a much later design built from scratch for getting into the 100kph club:
8078400324_c73e868f4f_b.jpg


...

That looks awesome - can I have one with an engine though. :lol_hitti
(BTW, is that tiny chook waiting for someone to push?)


.
 

oldironfarmer

Well-known member
Joined
Jun 25, 2016
Messages
6,664
Location
Terlton, Oklahoma
I'm really out of whack. I bought some LED's to replace 65w incandescent floodlights in my wife's dressing area. They were inexpensive enough for me, however when I look at the lumens they barely beat my T8 shop lights in lumens per watt. I had been feeling silly for outfitting my new areas with T8 bulbs but there is really not much savings in the extra expense for LED. I really thought there would be a savings in the light output per watt. Maybe in a few years.

Sail buggys are super cool!:thumbup:

But vacuum pumps ****.
 
OP
G

Guster

Well-known member
Joined
Mar 11, 2012
Messages
1,543
Location
Auckland, New Zealand
Just what I need Guster, another thread to subscribe to - just when I'm trying desperately to catch up on all my favourite threads. :willy_nil

Thanks for the complement BBChevro and happy to provide the distraction. It is now twice as hard for me as I must both contribute and keep things up on other threads too! :willy_nil

Does the vacuum bagging do away with the need for rolling/squeegeeing? (is "squeegeeing" a word? - it doesn't look right. :headscrat).

It is a word but no it doesn’t do away with it entirely. Still good to moosh the resin into the reinforcement. You might get away with doing the last layer or two and I find you can save some resin by having it soak into the reinforcement rather than waste it into the breather. However you stand the change of dry spots etc. so not always worth the gamble. The biggest benefit from vacuum bagging is conforming the reinforcement to your mold or shape – also removing air bubbles or voids, consolidating the reinforcement ie. pushing them tightly together and soaking up some excess resin giving you better strength to weight ratio

To do away with squeegeeing all together you need to spend even more time and money on resin infusion material, lower viscousity resins like vinylester resin and tooling. It is also more of an art than a skillset that works great for simple things but requires some experience to pull good parts out of complex molds every time.

Disposable gloves are your friend grasshopper - as well as an isolation from the nasty itchy fibres, it means you don't have to bathe in Acetone to remove the resin from your fingers. (paper cuts = :scared::shocking:).

I'm all over that. I find nitrile gloves last a bit longer but have some heavy duty ones for the real nasty stuff. Have another box in storage and buy a new one as soon as I empty one out. Never an excuse to be out of them.
33741262995_4facbf15c6_c.jpg


You can actually develop chemical sensitivity from long term contact with epoxy and I won’t even begin to explain how noxious the catalyst for polyester resin(MEKP) really is. Its MSDS document is quite an impressive piece of modern literature. Using solvents on your skin actually increases the resin’s absorbency into your skin so not the greatest idea for clean-up. I also try and avoid anything that causes the dust and fibres to go all over the place. Vacuum attachments where possible, wet sanding etc. etc. Even perfected my kiteboard builds so that the mold side is finished straight off the mold reducing all the sanding and painting by half. Mold release film is another trick to improve the finish, reducing effort/cost and exposure to nasty itchy stuff.

That looks awesome - can I have one with an engine though. :lol_hitti
(BTW, is that tiny chook waiting for someone to push?)

.

Hehe… you noticed the chick posing with my buggy. Yeah my wife used to keep some chickens and this one loved to photo-bomb. I have several engines… what size would you like. I have everything from 1.2sq.m. up to 13sq.m. depending on the wind strength and have been proven to reach 97kph already. Sadly I have beaten that speed on the water by 1kph in clocking 98kph though my current model of kites used on the water are nowhere near as fast anymore and only getting up to mid 80’s. That is not entirely a bad thing - I find I don't bounce as well as I used to. :lol_hitti

I'm really out of whack. I bought some LED's to replace 65w incandescent floodlights in my wife's dressing area. They were inexpensive enough for me, however when I look at the lumens they barely beat my T8 shop lights in lumens per watt. I had been feeling silly for outfitting my new areas with T8 bulbs but there is really not much savings in the extra expense for LED. I really thought there would be a savings in the light output per watt. Maybe in a few years.

Sail buggys are super cool!:thumbup:

But vacuum pumps ****.

Matches my findings too Andy. LED lighting has come a long way but flourescent tube lights are hard to beat just going by efficiency and spread. Similarly finding a suitable replacement for halogens are just as hard. Both are also near omnidirectional light sources and most LED lights and fittings has that as their major limitation. They do make a drop in LED replacement for some halogen tubes but they get nowhere near +2000Lumens. I have also seen fluorescent tube replacements but again no experience with them as the cost is still prohibitive for just messing around with them. I would be happy to put some of the panel lights in my shed though. Saves me banging and shattering a tube on my low ceiling in places.

I’m sure someone can pipe in with their experiences too as my scope is based on cost and what I can source. Not always the greatest on this side of the pond.

Hehehe…vacuum pumps do ****, but the must always blow at the other end.
 

Lyndon

Well-known member
Joined
Aug 11, 2014
Messages
2,535
Location
Sydney, Australia
Guster

Sorry I'm late to the party..... But I am so FAR behind on GJ ATM.

Good to see you've jumped in. About time.

I'm just doing this post so it will update my subs list and I won't miss out on anything.

Lyndon
So Freakin' Busy
 
OP
G

Guster

Well-known member
Joined
Mar 11, 2012
Messages
1,543
Location
Auckland, New Zealand
Guster

Sorry I'm late to the party..... But I am so FAR behind on GJ ATM.

Good to see you've jumped in. About time.

I'm just doing this post so it will update my subs list and I won't miss out on anything.

Lyndon
So Freakin' Busy

Hardly late at all... it's not going anywhere in a hurry. Unless there is wind blowing or a real storm out. :) We have the tail-end of Debbie blowing all over NZ at the moment. It is very distracting watching the flags across the road. :willy_nil

Besides, you got it all going on right now. Crowded house, catching up on business and an addition to plan! At least you don't have to worry about making the house child safe as well. :spit:
 

Lyndon

Well-known member
Joined
Aug 11, 2014
Messages
2,535
Location
Sydney, Australia
Hardly late at all... it's not going anywhere in a hurry. Unless there is wind blowing or a real storm out. :) We have the tail-end of Debbie blowing all over NZ at the moment. It is very distracting watching the flags across the road. :willy_nil

Besides, you got it all going on right now. Crowded house, catching up on business and an addition to plan! At least you don't have to worry about making the house child safe as well. :spit:

Guster

Ah - but I did!!!!!

We had to find a way to contain the eldest's 2 French Bulldogs, especially to be able to give our 12 year old dog a break from the 2 less than 2 year olds. So I was fitting a dog barricade last thing on Sunday evening......

Lyndon
Still tired. :hellobye: :hellobye:
 
OP
G

Guster

Well-known member
Joined
Mar 11, 2012
Messages
1,543
Location
Auckland, New Zealand
Guster

Ah - but I did!!!!!

We had to find a way to contain the eldest's 2 French Bulldogs, especially to be able to give our 12 year old dog a break from the 2 less than 2 year olds. So I was fitting a dog barricade last thing on Sunday evening......

Lyndon
Still tired. :hellobye: :hellobye:

That is might grandfatherly of you! :beer:
 

dchance

Well-known member
Joined
Oct 3, 2016
Messages
614
Location
OKC
Guster,
Glad to see a new thread to follow. From the topics already discussed there is much to learn and understand. I might not use it all but like to learn new things. Of course as I get older I also get to learn old things.

Dwight
 
OP
G

Guster

Well-known member
Joined
Mar 11, 2012
Messages
1,543
Location
Auckland, New Zealand
Guster,
Glad to see a new thread to follow. From the topics already discussed there is much to learn and understand. I might not use it all but like to learn new things. Of course as I get older I also get to learn old things.

Dwight

Thanks Dwight! Happy to share some of my adventures.

Real busy with kids soccer season starting, parent teacher interviews and the last soggy end to cyclone Debbie wreaking havoc with parts of country. Looks like another cyclone on the way next week. Not close enough to let me take a day off to go stormchasing but looks like a lot of stormy rain in it. :sad:

Got a new tool acquisition today and will share a bit about it as is customary on GJ. Kids wanted to cut some patterns out of wood but I'm not quite ready to set them free on a bandsaw yet. While I have some manual scroll saws I've wanted a decent powered unit for a while. This one came up and while it is not variable speed it is solid, has a 16" throat and takes both pinned and pinless blades. I can always add speed adjustment later.
33730630212_c1b294aece_b.jpg


Turns out the previous owner was a set designer/builder who has worked some large recent movies so we ended up chatting till closing time and he showed me some of his most recent work. Funny how it is right across the road from a friends offices and never knew it was there. Always nice to talk to people in different parts of the industry. I might have helped him with a product supplier he's been looking for since a recent supplier closed up shop.

No QST this weekend though. Kids have a party to go to in the morning and my friend is in the country. I'm driving up north after lunch to catch up and go for 2 days kitesurfing, coming back Sunday afternoon. No complaining here. :thumbup:
 

Knyte Tyne

Well-known member
Joined
Apr 23, 2014
Messages
197
Location
Johannesburg South Africa
This is Great... I use the Same Vacuum Forming Process over Foam core moulds for My longboards (skateboard Kind). Lack of a vaccuum pump has mean I havnt done it for awhile. Trying to draw all the air out with a Reversed Valve Bicycle pump is no fun at all (nor is the Heart attack it can cause... Man its tough work)

I've researched the Old Fridge Pump option. Acquired 2 old Freezers and just haven't pulled them apart yet.

I've only worked with wood as yet, But keen to start trying out some composites materials...

Looking good. Will be following along for this one.
 

oldironfarmer

Well-known member
Joined
Jun 25, 2016
Messages
6,664
Location
Terlton, Oklahoma
This is Great... I use the Same Vacuum Forming Process over Foam core moulds for My longboards (skateboard Kind). Lack of a vaccuum pump has mean I havnt done it for awhile. Trying to draw all the air out with a Reversed Valve Bicycle pump is no fun at all (nor is the Heart attack it can cause... Man its tough work)

I've researched the Old Fridge Pump option. Acquired 2 old Freezers and just haven't pulled them apart yet.

I've only worked with wood as yet, But keen to start trying out some composites materials...

Looking good. Will be following along for this one.

A man after my own heart! Need one old refrigerant compressor so acquired two full units and have not pulled them apart yet. I would go one step further and never pull them apart thinking they might be repaired as freezers.:willy_nil

Cool scroll saw. I have mixed emotions on scroll versus band for kids. For an alert child the band saw may be safer as it never grabs the work and makes it jump. Maybe I don't use a scroll saw right.
 
OP
G

Guster

Well-known member
Joined
Mar 11, 2012
Messages
1,543
Location
Auckland, New Zealand
Guster, that saw is one sweet acquisition, done well. :thumbup:

Familly comes first, enjoy your weekend...:thumbup:

Regards

Thanks 1/2 Cup. It needs a little maintenance but nothing a bit of lubrication. Otherwise I might clean and wax the work surface at least. Nice not having rust and grime transfer to your work.

Family get their fair share for sure! :thumbup:

You have a great weekend too mate.


This is Great... I use the Same Vacuum Forming Process over Foam core moulds for My longboards (skateboard Kind). Lack of a vaccuum pump has mean I havnt done it for awhile. Trying to draw all the air out with a Reversed Valve Bicycle pump is no fun at all (nor is the Heart attack it can cause... Man its tough work)

I've researched the Old Fridge Pump option. Acquired 2 old Freezers and just haven't pulled them apart yet.

I've only worked with wood as yet, But keen to start trying out some composites materials...

Looking good. Will be following along for this one.

Thanks. I have built some mountainboards with custom built trucks too. Might add that to the list of things I can write about.

One of my colleague who plays airsoft and made himself a high pressure pump using a bike pump attached to an old bicycle wheel in a way that it pumps a full stroke on every rotation. The wheel is then driven by an old sewing machine motor. Best part is the sound it makes… very steampunk!

The older they are the better the pumps in my opinion. They will run a very long time as long as you keep the oil in them though they do get warm and need to cool down from time to time. Also good if you can filter the output as they will create a bit of oily mist that is not always a good thing in a composite building environment. I just used an old 2 stroke motorbike air filter I had on hand for the job. This sat over a cheap plastic funnel that was fitted to the copper output tube in a way that lets the oil drain back in. I think I may have added a angled baffle plate inside the whole contraption so that the output would strike it and deposit most of the liquid oil. If you need a cheap vacuum regulator you can modify an old distributor’s vacuum advance along with a microswitch, spring and some fasteners. Few good examples of it on the internet if you need plans.

Taking the pump out is not the most eco-friendly thing unless you have a tank to reclaim the refrigerant and best done outside. Nobody would take the reclaimed refrigerant over here anyway. I nip the coil high up so the refrigerant drains off then sever the copper tube where it returns upward to keep as much of the oil inside it. The electrics are straight forward to.

I actually grew up in your part of the world and know just how hard it is to get hold of stuff, especially at affordable cost. Was good in the older days when Ciba Geigy was still in the country but believe a lot of good stuff is now mainly import and the exchange rate is killer. Finding a good alternative to getting a job done was more of a way of life and thrift was just the added bonus.

The friend I’m going to visit today is an NZ’er who had to come back from SA to sort out his visa before settling with his SA’n wife in Cape Town. They recently bought a Landy and roadtripped the east coast during the recent summer. When he bashed up the nose on his surfboard he was surprised that none of the local hardware stores stocked any decent resins. Ended up using epoxy grout for the repair which was actually no worse than some of the so-called surfboard repair kits you can buy from major brand surf shops but highlighted some of the complexities there. He is hoping to set up shop making kite boards etc. He spent a few years working for a large kitesports brand in Hong Kong and plans to import materials in bulk along with CNC machinery etc.

A man after my own heart! Need one old refrigerant compressor so acquired two full units and have not pulled them apart yet. I would go one step further and never pull them apart thinking they might be repaired as freezers.:willy_nil

Cool scroll saw. I have mixed emotions on scroll versus band for kids. For an alert child the band saw may be safer as it never grabs the work and makes it jump. Maybe I don't use a scroll saw right.

You have enough projects to keep you from 5 lifetimes of boredom without going and restoring fridges too Andy! :lol:

Was more thinking along a bump and a small cut is probably less of an issue than loosing 1 or 2 fingers before they even feel it. I’d prefer them mastering hand tools but my son and daughter are only 7 and 8 respectively and don’t quite have the strength and coordination to use most of the stuff we take for granted. They will still be supervised and it is just for a few minutes. I have wanted one a few times for making small clean cuts in thicker materials.

Enjoy your last Saturday of the week Andy.
 
OP
G

Guster

Well-known member
Joined
Mar 11, 2012
Messages
1,543
Location
Auckland, New Zealand
Surprisingly limber for having been out 2 days in a row with decent surf riding sessions. Planned to be on the water right after breakfast yesterday. That way I can be back on the road by lunchtime to clear the late afternoon traffic. Conditions had improved somewhat from the evening before with 3m swell conditions and a bit more wind. Lovely flat water stretch past the sandbar on the rivermouth and some significantly sized standing waves in the outgoing tide. Which explains pretty much how this happened…
33554072780_86e3aec6e3_c.jpg

That is a crack running right across the board from landing a certain +100kg clumsy ape in the valley of two standing waves. :rocker:

Only my second board to break this way. The other was made by someone else and broke under similar conditions. Everyone was surprised that I wasn’t really all that upset. Rather break a board than blow out a knee or a femur and after all, the board was over 2 years old and had a hard life. Now I get to make a nice new one, maybe even two, and I can document the process for a nice write-up. Just have to stock up on resin and stainless threaded inserts before Easter weekend and not get in anyway distracted by cyclone Cook rolling in later this week. That might be more of a challenge. :dunno:
 

metalhead140

Well-known member
Joined
Jan 15, 2013
Messages
1,456
Location
NSW, Australia
In for the thread. You play with some cool stuff! I'd love to hear more about the kite buggy. Working with composites has been high one my 'want to learn' list for a while too.
 
OP
G

Guster

Well-known member
Joined
Mar 11, 2012
Messages
1,543
Location
Auckland, New Zealand
In for the thread. You play with some cool stuff! I'd love to hear more about the kite buggy. Working with composites has been high one my 'want to learn' list for a while too.

Thanks.

I somehow missed this post in the madness of Easter, tropical storms and other goings on. Wife and kids are staying overnight with the in-laws and I've just enjoyed a few hours QST, steak dinner and about to relax with a glass of South African Pinotage.

Friends of mine have been up in Queensland on Yeppoon beach for an annual Australian kite buggy get together. Looks like they had great weather too.

Kitebuggies have been a bit of an evolution over the years. Making use of what is available. Both techniques and also tools. From the get go my first constraint was cost given the cost of stainless. You can use mild steel and while it is stronger I hate having rust on everything. I also try and avoid painting where possible. I soon discovered a local metal recycler that doesn't mind people scrounging for usable material and only charges a little more than scrap price if you have cash handy. One benefit of this is that stainless tube used for steam etc. often has bends in it which is actually quite handy if you need to make something that has bends.
14223726173_abac3a4b42_b.jpg


Another was the cost of large fasteners. I prefer larger bearings and the bearings on my wheels have an 25mm ID. The standard is 20mm to compensate for lack of heat treated stainless fasteners. Many guys also bend the 20mm bolts so I opted for 25mm and decided to make stub axles instead. This meant i only need an ~8mm bolt to keep the wheel on. I also started testing composite rear axles. Theory being that the right design will absorb wheel bounce and kill harmonic judder at certain speeds. This helps keep the wheels in contact allowing more kite power to be transferred into forward motion. So far it has been fairly successful too. The most recent is a little too bendy though. I do have steel tube axles and prefer them when riding in dunes.
3732834023_9ffd0e240a_z.jpg


The rest just involves a lot of cutting and welding based on dimensions and designs over the years. I developed my TIG welding skills specifically for this though it has come in handy for a lot more. The hoop in the picture below near the chair is the back frame for the leading link front suspension. Consisting of 19mm tubing bent by hand over and MDF former. You can see the other bends that I plan to incorporate. Most just sliced off at the right angle and welded onto the next section. I have dies and parts to make a hydraulic mandrel tube bender but it's always at the bottom of my list of priorities.
14203582815_d31677ccbe_b.jpg


The leading link suspension is actually based on designs used in speedway motorbike racing. Though simplified down to a swingarm retained by a large ruber grommet/mount. Again with the purpose to absorb bounce and keep the wheel in contact. the original elastomers were imported from MacKay rubber in Australia but started getting a bit expensive so I even went through a phase of machining up some split molds and casting them in two component polyurethane rubber. This is where the pressure cooker came in really handy to degas the mixture.
4208213286_88c35c9396_z.jpg


Lately my interest has dwindled a bit due to other adventures. Though I still make a point of going out to the to annual functions. The Blue Balls Buggy Bash on Queens birthday weekend and the Moose Meet held at the north end of Muriwai beach on labour day weekend. Both adventures requiring offroading, camping in the middle of nowhere and riding off into vast dunescapes where you can almost lose yourself for a day.
2435614871_6bffd362c1_z.jpg

33296830073_4e5b47a382_z.jpg

33951205032_3bc0b27b76_z.jpg
 
OP
G

Guster

Well-known member
Joined
Mar 11, 2012
Messages
1,543
Location
Auckland, New Zealand
That's cool!

Thanks!

Really cool stuff! And an excellent imagination coupled with great craftsmanship means the sky's the limit!:thumbup:

That's the way I like to think about it too. :thumbup:

I have a friend who reminds me my workshop is a room full of solutions looking for problems! I just wish I had more of the problems I could go into the workshop to fix. :lol:

Had a day full of OWASP seminars at the local university auditorium. Pretty tired for a day full of sitting and listening. Though I came home to a delivery of 4.8L epoxy resin, 1kg of milled fibre, 3m of 300gsm glass and 2m of 200gsm fiberglass. Just hoping my order of threaded inserts arrive before the weekend else I may have to buy a few on the way home tomorrow just to get me through the weekend.

Almost Saturday!
 
OP
G

Guster

Well-known member
Joined
Mar 11, 2012
Messages
1,543
Location
Auckland, New Zealand
Building a twintip kitesurf board Part1:

Well you start with a piece of PVC foam. In this case 12mm thick, 80kg/cubic meter Klegecel/Divinycel. Cut a little larger than the board. I give it about 20mm margins. This one wasn’t long enough so added an offcut to the end, glued on using Gorilla glue.
34493420111_2b2f05de08_c.jpg


Then I mark the centres both ways and use my previously made MDF template to make some marks for where threaded inserts and fin positions will go.
34582679126_6dc9dcb76d_c.jpg


The template is a little smaller in the outline so I can use it to router a channel in the circumference on the base of the board. This is done with a trim router and the template is lifted at the tip with a spacer to reduce the channel at the tips of the board. This is filled with a toughened resin and will be exposed once the board is laminated and the mold flash cut off. There are a few reasons to build it this way which I can cover in detail if anyone is interested. The chunk of metal is something of another project I’m just using as a big paper weight.
34493420041_fde7e5d88f_c.jpg


Then I punch out the holes for the threaded inserts for the footstraps and higher density PVC foam where the holes for fin bolts will ended up. You can see the hydrofoil foam cores and the cedar struts that will connect them in this foto(multitasking) Those slots in the foil cores will be filled later on.
34493419641_d9398486e9_c.jpg


Tape up the holes… this will be the bottom so insertes will be glued in form the other side.
34493419691_18ff82fb1a_c.jpg


At this stage I had already filled the rail outline channel with resin. I used the leftover resin to fill a centre section of the hydrofoil cores I am also making. This is so I can drill holes right through and countersink for fasteners. The black thing is my digital scale in a ziplock bag to keep spills off and welding rods sometimes make great stirrers. :lol:
33813998023_8ca40984e2_c.jpg


To be continued…
 
To avoid these ads, REGISTER NOW!
Top Bottom